

Delicate Tropical Knotted Gemstone Choker
Delicate Tropical Knotted Gemstone Choker
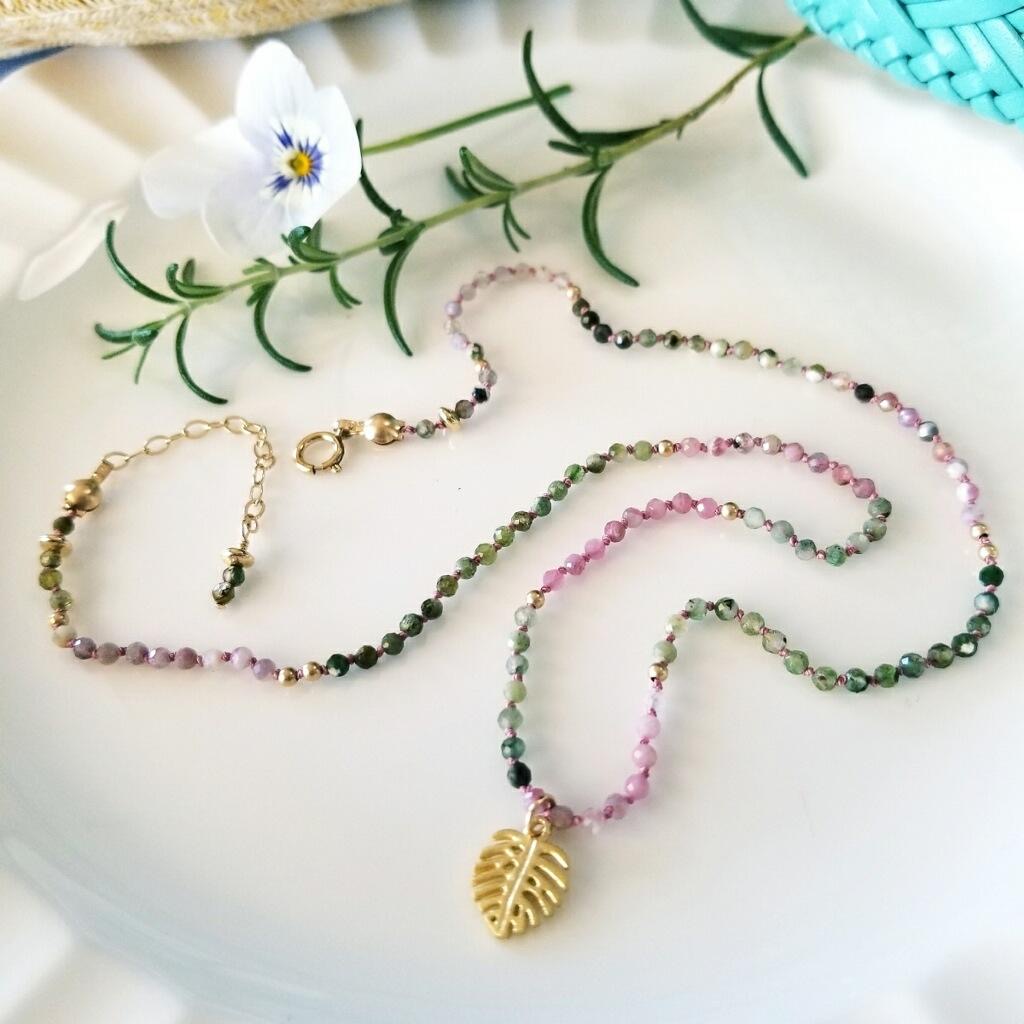
Materials Needed:
- 2mm Faceted Round Tourmaline Multi Color (1 strand)
- Amoracast – Monstera Leaf Vermeille (1)
- Griffin Silk #2 Dark Pink (1)
- Clamshells 14k Gold Filled (2)
- 6mm Spring Clasp 14k Gold Filled (1)
- Chain 14k Gold Filled (large enough links to fasten into, used for extension chain) 1 ½” Used
- 4mm Round 19g 14k Gold Filled Jump Rings (3)
- 2mm Sandblast Beads, 14k Gold Filled (10)
- 3.6 x 2mm Saucer Beads 14k Gold Filled (3)
- Head Pin – 1 ½” 26g 14k Gold Filled (1)
Finished Length 16 – 17 1/2”
Tools Required
Instructions on Construction:
I am not usually a big fan of ironing my Griffin silk but do find that when using the lower #’s (thinner cords) & smaller beads this helps a lot, it takes out the kinks that happen from the packaging. With heavier beads this isn’t usually a problem, the weight will pull the kinks out. You can also pre-stretch your cord which should help keeping knots where you want them to be!
1. The first thing you will do is attach the cord through the clamshell so that you have a means of attaching the finished, knotted gemstone, chain to the clasp. Tie an overhand knot at the end of your silk cord (the opposite end to where the needle attaches) leaving a small tail (sometimes I do a 2nd knot) and then take a size 11 seed bead & thread on so that it sits next the knot. At this stage you are ready to thread your needle & cord through the hole in the clamshell where your knotting will start.
* The reason I add a small seed bead on the inside of my clamshell is because it adds an extra layer of security against my
knot pulling through the hole in the clamshell. This is especially important when using the smaller gauge knotting cords).
** Also note that some clamshells hinge at the back & some on the side, plus some have hole to use jump rings with & others (like the ones used here have a small arm that you bend to form the link that attaches to clasp. Phew, information overload!)
2. The cord should now be exiting your clamshell at the appropriate place. Tie your first knot so that it sits tights against the opening of clamshell. Use you preferred way of knotting, tweezers, awl or fingers… just make sure that your knots are in the correct place before tightening fully…. It is a bear to try to undo knots!
3. At this stage I thread on all my beads in the sequence that I desire. With the gorgeous tourmaline beads used here, I pretty much followed the sequence that that they came in (taking out any that didn’t please me) and adding a few of the 2mm sand blast gold beads and saucer beads at various places along the way. I liked putting them in where the color sequence changed & in a few places I added two beads rather than one. Your layout may be different.
4. The griffin silk has a built-in needle that helps a lot with threading your beads. I try to thread the beads straight from the strand they come on directly onto my griffin silk.
* You may find this easier if you trim the needle a little, not so bendy that way!
5. Let the knotting begin! In this piece I knotted between every bead, making sure that the knots were nice and tight against the previous bead.
6. Knot beads to your desired length, measure often & remember that your clasp will add to this measurement. It is easier to add extra length with a slightly longer extension chain than it is to decrease the length. Did I mention that it is a bear to undo knots!
7. Once you reach your desired length, do a final knot, then enter into the second clamshell so that you are in the position with cord coming through from outside into the interior of the shell (the opposite of how you started your piece). You will now add a size 11 seed bead & tie one or two knots to tightly secure the seed bead.
8. At this stage I trim or use my Thread Zap to get rid of excess cord…make sure your knots are tight first! I use a little glue to secure the bead/knot to the inside of clam shell…. You do not want excess cord to show when clamshell is closed.
9. If you are using the type of clamshell with 2 rings you may now gently close your clamshell with your needle nose pliers & you can use jump rings to attach spring clasp to clamshell on one end & extension chain on the other end. Open your jump rings with flat nose plier & needle nose plier (one on either side of the break point) open to the side & only as much as needed to thread on clasp or chain, then close so that pieces line up nicely.
10. If you are using the other type of clamshell you will need to take your round nose pliers and manipulate the arm so that it will be enclosed when the clamshell is closed. This acts in place of a jump ring so don’t forget to thread on spring clasp/chain before gently closing your clamshell with needle nose pliers.
11. The chain is finished with a cool wire wrapped dangle. I have taken the headpin added two of the gemstones & one saucer bead, then wire wrapped this to the end of the chain. If you do not have wire wrapping in your skill set yet, you could add a petite charm to the end of the chain with a jump ring, this would also be a cool way to finish this choker.
12. Finally, open your 4mm round jump ring add the monstera (Leaf) charm, using your flat nose & needle nose pliers, then find the mid-point of your choker & thread through your open jump ring & then carefully close the jump ring.
13. Try on your new necklace & admire your handiwork!
14. Enjoy!
Jewelry designed by Steph Stirniman
Recent Posts
-

Christmas Wine Charms - Mini Tutorial
Christmas Wine Charms - Mini TutorialThese wine charms are sure to be the center talking point at yo …25th Nov 2024 -

Christmas Bow Garland - Mini Tutorial
Christmas Bow Garland - Mini TutorialCreate your own holiday decor with a Christmas-colored bow garl …14th Nov 2024 -

Charm Necklace Tutorial
Charm Necklace TutorialEmbrace individuality with our Personalized Charm Necklace tutorial, a perfec …6th Nov 2024