

Luna Moth 3-Strand Amazonite & Silver Chain Necklace
Luna Moth 3-Strand Amazonite & Silver Chain Necklace
Skills Needed: Wire Wrapping
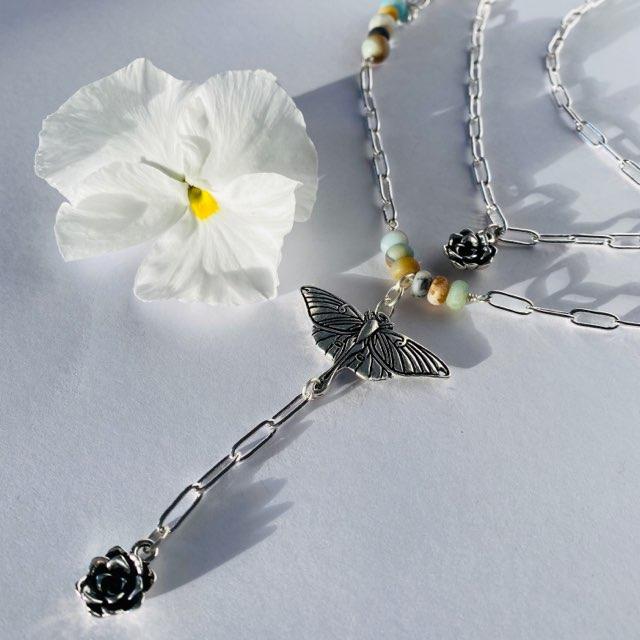
This necklace features three different strands that are attached at the clasp. The longest strand has nine wire wrapped segments of amazonite beads that are connected by chain links. * You can substitute your favorite gemstone. This strand has a dangle that includes a Luna moth and a succulent charm. The middle stand has a succulent charm at the center point and the shortest strand is just chain. * You can customize the various lengths for the three strands.
Materials Needed:
- 8mm Matte Round Amazonite (16)
- 4x6mm Matte Rondelle Amazonite (20)
- Paperclip Chain (5’), or chain of your choice
- 22g Silver Craft Wire (1 Spool)
- Medium Oval Silver Plated Jump Rings (11)
- TierraCast – Garland Toggle Silver Plated (1)
- TierraCast Luna Moth Pendant Link Silver Plated (1)
- TierraCast Succulent Charm Silver Plated (2)
Finished Length: Longest Chain is approx. 30” with 3.5” Dangle, Middle Chain is approx. 22”, Shortest Chain is approx. 17”
Tools Required
Needle Nose Pliers (also known as chain nose)
Bead Mat
Key Code:
A = 8mm Matte Round Amazonite B = 4 x 6mm Matte Rondelle Amazonite
Instructions on Construction:
We will work on the longest strand of the necklace first.
Before starting the first wire wrapped segment you need to decide on the size of loops that you will be making, then using a sharpie put a line across both jaws of your round nose pliers so that you can line up your wire at the same place each time you form a loop. I made a line approx. 1/4” from the end of pliers for my loops in this project.
1. Start by cutting a 5-link section of chain using your wire cutter.
2. Segment # 1: Cut a 3” section of 22g craft wire and using needle nose pliers make first 90-degree angle approx. 1.25” from end of wire (this is used to form the first wire wrapped loop). Use your round nose pliers to make loop, thread this loop into an end link on the chain you have just cut and then wrap wire one time, do not trim.
3. Thread on A (1) then use your needle nose pliers to form a 90-degree angle then form loop.
4. Cut a 5-link section of chain, then attach this to the loop you have just made and wrap one full turn, do not trim. Now continue wrapping the wire on alternate sides one half turn at a time, until you have reached the bead on both sides, trim and tap in any pointy ends of wire if needed. * The beauty of wrapping both sides at the same time is that you end up with an equal number of wraps on either side of the bead/s.
5. Segment # 2: Cut a 4” section of wire, form loop and attach to last section of chain, wrap wire once.
6. Thread B (1), A (1), B (1), A (1), B (1) then form second loop.
7. Cut a 3-link section of chain, then attach this to the loop you have just made and wrap one full turn, do not trim. Now continue wrapping the wire on alternate sides one half turn at a time, until you have reached the bead on both sides, trim.
8. Segment # 3: Cut a 4” section of wire, form loop and attach to last section of chain, wrap wire once.
9. Thread B (1), A (1), B (1), A (1), then form second loop.
10. Cut a 5-link section of chain, then attach this to the loop you have just made and wrap one full turn, do not trim. Now continue wrapping the wire on alternate sides one half turn at a time, until you have reached the bead on both sides, trim.
11. Segment # 4: Cut a 4” section of wire, form loop and attach to last section of chain, wrap wire once.
12. Thread A (1), B (1), A (1), B (1), A (1) then form second loop.
13. Cut a 7-link section of chain, then attach this to the loop just formed and finish wrapping both sides, trim.
14. Middle Segment: Cut a 5” section of wire, form loop and attach to last section of chain, wrap wire once.
15. * Before threading middle segment, we will form the dangle that hangs at the mid-point of necklace. Take three jump rings and using flat nose and needle nose pliers connect them to form a three-link chain. For right-hand dominant people this is easiest done by holding the flat nose pliers in your left hand, gripping the jump ring to the left of the opening and with needle nose in right hand, on right side of opening, twisting away from your body. Do not open too far, connect into second jump ring and close by twisting right hand back to where you started. Close jump ring carefully so that both sides line up and there are no gaps or jagged edges. * If you are left hand dominant reverse these instructions. Connect the third jump ring into the loop at the top of the moth pendant. Cut a 4-link section of chain, using a jump ring connect this to the loop at the bottom of the moth pendant. Take one more jump ring and attach the loop on succulent charm to the final link in the chain.
16. * Now you can start threading for the middle segment: Thread B (3), then the top jump ring of the dangle just formed, B (3) then form second loop.
17. The second side is a mirror image of the first side. When this is finished, set aside while the other two strands are worked on.
18. Middle Strand: Cut a 61-link section of chain an attach a succulent charm at the midpoint using a jump ring.
19. Top Strand: Cut a 45-link section of chain. * This will give a finished length of approx. 17” (when clasp is added), if you would prefer a shorter length make adjustments here.
20. *** There are a couple of things to think about as you assemble the necklace: #1 You want to make sure that when you attach the two strands with the succulents on, that you have them both facing in the same direction! #2 If you are right-handed it feels more comfortable when putting on your necklace if you have the “bar” part of clasp in your right hand, so think about that when deciding which sides, you are attaching clasp to. Lay it out in front of you if this makes it easier to work out. Reverse this if you are left-handed.
21. 3-Strand Assembly: Attach one jump ring to the “bar”-section of the toggle clasp, close jump ring. Take a second jump ring and thread on the end-link of the longest strand, then thread into the jump ring that you just attached to the “bar” part of clasp, close carefully leaving no gaps.
22. Take a jump ring and thread the end link from the middle strand, then thread the end link from the top strand, then thread this into the closed jump ring that you attached to the bar section. You will now have all three links attached to one side of the clasp.
23. Repeat this for the second side of necklace.
24. You are now ready to try on your new necklace & admire your handiwork! Enjoy!
Jewelry designed by Steph Stirniman at https://magpiecollectives.etsy.com/
Recent Posts
-

Dancing Pearl Cowboy Charm Leather Bracelet
Dancing Pearl Cowboy Charm Leather BraceletThis tutorial is a spin of our Dancing Gemstone Brac …17th Dec 2024 -

Christmas Wine Charms - Mini Tutorial
Christmas Wine Charms - Mini TutorialThese wine charms are sure to be the center talking point at yo …25th Nov 2024 -

Christmas Bow Garland - Mini Tutorial
Christmas Bow Garland - Mini TutorialCreate your own holiday decor with a Christmas-colored bow garl …14th Nov 2024