

“Lunar Eclipse” - Short Necklace
“Lunar Eclipse” - Short Necklace
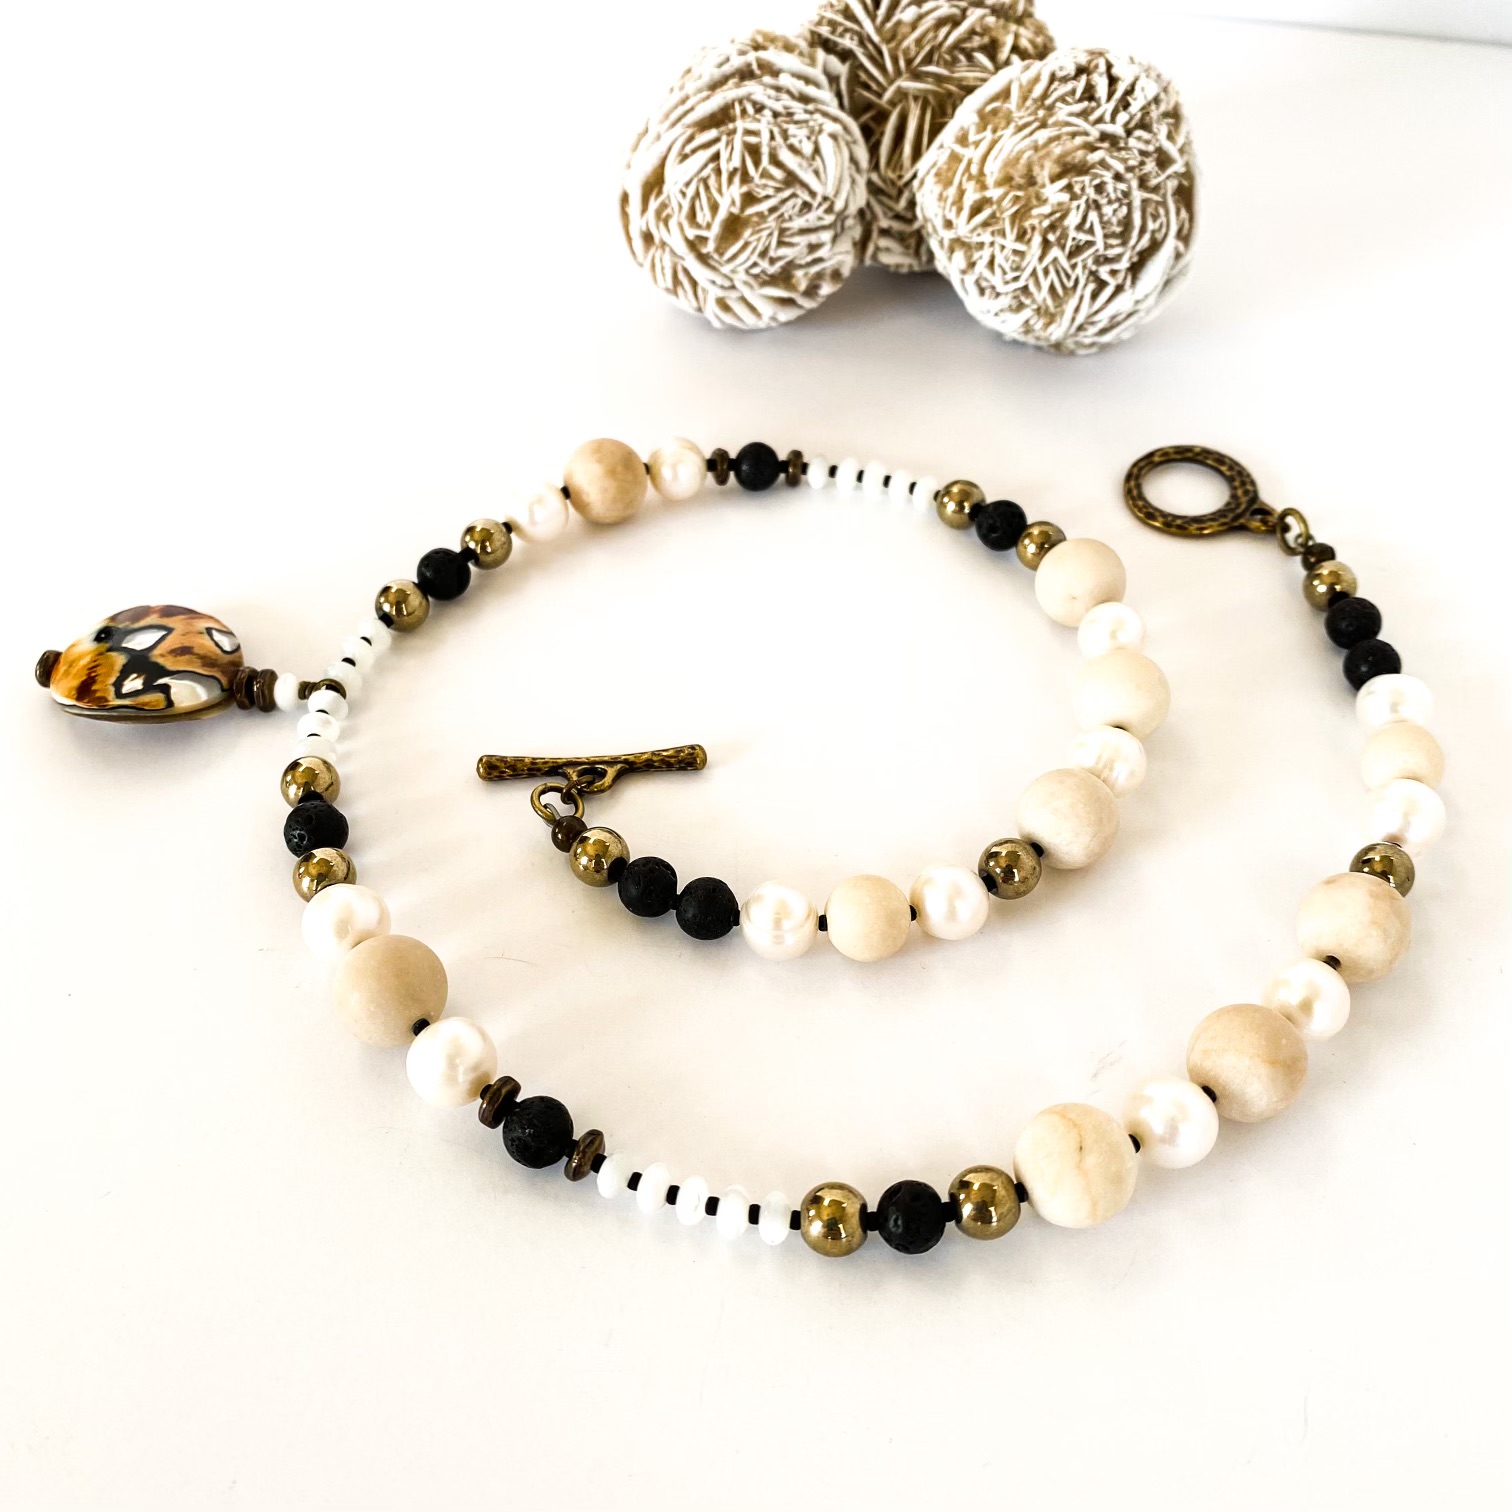
“A lunar eclipse occurs when the Moon passes directly behind Earth and into its shadow. This can occur only when the Sun, Earth, and Moon are exactly or very closely aligned, with Earth between the other two. A lunar eclipse can occur only on the night of a full moon” – Wikipedia. This necklace set symbolizes the mystery and drama associated with a lunar eclipse.
Finished Length: Approx. 17” with a 1 3/8” pendant
Materials Needed for Necklace:
- 8-9mm Ivory/White Freshwater Potato Pearls (12)
- 8mm Riverstone Jasper, Round Matte (10)
- 6mm Pyrite Round (10)
- 6mm Black Lava Rock, Round (8)
- 3x4mm Mother of Pearl Rondels (17)
- TierraCast 5mm Nugget, Brass Plated (7)
- Size 11 #F401 Black Matte, Miyuki Seed Beads (1 Tube)
- 4mm Crimp Covers, Antique Brass (2)
- 3” 21g Headpins, Antique Brass (1)
- TierraCast – Craftsman Toggle Clasp Set, Brass Plated (1)
- 6mm Rd Closed Jump Rings, Antique Brass (2) * Optional – I like to crimp into a closed jump ring and then use an open Jump ring to attach clasp as this gives you options if you ever want to change out clasp, you can crimp wire directly onto clasp if that is your preference.
- Small Oval Jump Rings, Antique Brass (2) * Optional as above.
- Soft Flex Beading Wire, Medium, Satin Silver (approx. 20”)
- 20mm Coin “Saramatieus” Shell
Tools Required
Key Code: A = 8-9mm Freshwater Pearls B = 8mm Matte River Stone Jasper D = 6mm Pyrite E = 6mm Lava Rock F = Mother of Pearl Rondelles G = 5mm Brass Nuggets H = Size 11 Black Seed Beads J = Shell Coin
Instructions on Construction:
1. Start by making the wire wrapped pendant so that it can be threaded directly onto beading wire as part of the beading sequence. Take head pin and load G (1), J (1), G (2), F (1), using needle nose and round nose pliers,
create a wire wrapped loop that is large enough to easily thread onto beading wire. Trim with wire cutter and tamp in pointy end.
2. Cut a 20” section of beading wire (using flex wire cutter if available), thread on crimp tube & attach to closed jump ring, using needle nose pliers. * Keep your wires parallel when crimping, this makes for a more secure attachment and remember to give a test pull on your wire to make sure you have tamped down firmly enough.
3. Thread as follows: E (1), H (1), A (1), H (1), B (1), H (1), A (1), H (1), D (1), H (1), B (1), H (1), A (1), H (1), B (1), H (1), A (1), H (1), B (1), H (1), D (1), H (1), E (1), H (1), D (1), H (1), F (1), H (1), * repeat underlined section five times, G (1), H (1), E (1), H (1), G (1), H (1), A (1), H (1), B (1), H (1), A (1), H (1), D (1), H (1), E (1), H (1), D (1), H (1), F (1), H (1), * repeat underlined section three times, thread on pendant. The second side is a mirror image of the first side.
4. Crimp wire to the second, closed jump ring. Place crimp cover making sure that the two edges come together evenly. * Leave enough slack in the wire so that your beads have enough room to sit easily, if you crimp your wire too tightly the necklace will be rigid and there is a chance that the beading wire may break!
5. Adding Clasp: using your needle nose and square nose pliers open oval jump ring and connect closed jump ring to loop on one part of toggle clasp. Repeat with second side of clasp.
6. Place crimp covers making sure that the two edges come together evenly.
7. You are now ready to try on your necklace & to admire your handiwork. Enjoy!
Jewelry designed by Steph Stirniman at https://magpiecollectives.etsy.com/
Recent Posts
-

Christmas Wine Charms - Mini Tutorial
Christmas Wine Charms - Mini TutorialThese wine charms are sure to be the center talking point at yo …25th Nov 2024 -

Christmas Bow Garland - Mini Tutorial
Christmas Bow Garland - Mini TutorialCreate your own holiday decor with a Christmas-colored bow garl …14th Nov 2024 -

Charm Necklace Tutorial
Charm Necklace TutorialEmbrace individuality with our Personalized Charm Necklace tutorial, a perfec …6th Nov 2024