
Tutorials
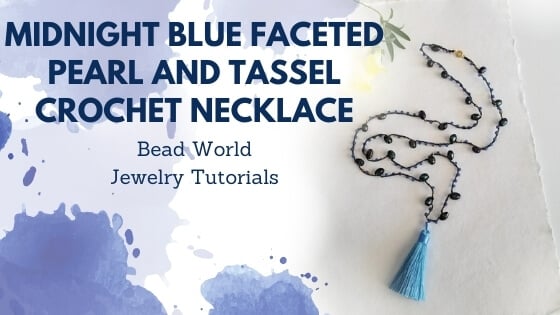
Midnight Blue Faceted Pearl and Tassel Crochet Necklace
Midnight Blue Faceted Pearl and Tassel Crochet Necklace

Materials Needed:
- Size 8 Matsuno Seed Beads F399N Purple/Sapphire Lined Matte (78)
- Size 11 Miyuki Seed Beads #4204F Dura Galvanized Champagne Matte (28)
- 6mm Faceted Freshwater Pearls, Peacock, 6x8mm Rice. (1 Strand)
- 6mm Ball and Socket Clasp Gold Plated (1)
- Black Macramé Cord – S-Lon Micro, Black
- 4.1 x 6.4mm Oval 21g 14k Gold Filled Jump Ring, Gold Plated (1)
- 2.5” Tassel – Light Blue (1)
- GS Hypo Cement
Finished Length Approx. 36” Tassel Pendant has approx. 2 ¼” Drop
Tools Required
#2 (1.5mm) Crochet Hook
Darning Needle
Optional: Thread Zap
Key Code for Beads:
PS8 = Size 8 Purple/Sapphire Lined Seed Bead G11 = Size 11 Gold Seed Bead FP = 6mm Faceted Pearl
Instructions on Construction:
1. You will start by pre-loading the beads onto the macramé cord. The threading sequence is as follows: G11 (1), PS8 (1), G11 (1), FP (1), PS8 (5), FP (1), G11 (1), PS8 (1), G11 (1), * Repeat the underlined sequence so there are a total of six repeats, FP(1), PS8 (2) * This is the midpoint and the second half is a mirror image of the first half.
2. Start with chain of eight stitches (these will be used to attach clasp), then catch bead into next chain stitch. * When instructions say “Chain followed by a number” this is the number of chain stitches between the beads, it does not include the stitch the bead is attached to. Pattern is as follows: G11 (1), Chain 1, PS8 (1), Chain 1, G11 (1), * Chain 3, FP (1), Chain 3, PS8 (1), Chain 2 (underlined five times), Chain 1, FP (1), Chain 3, G11 (1), Chain 1, PS8 (1), Chain 1, G11 (1) * Repeat so that there are a total of six of these sections. Continue pattern as follows: Chain 3, FP (1), Chain2, PS8 (1), Chain 2, PS8 (1), Chain 1 *This is the center point, the second side is a mirror image of the first side. * The tassel is attached with a jump ring when the necklace is finished.
3. I use a tight tension when I crochet with beads, yours will probably be different so I suggest you check how many repeats you will need to reach your desired length. Finish with a chain of eight stitches.
4. Cut macramé cord (leaving a tail length that is long enough to sew on clasp) and thread through loop on clasp
* If you are having problems getting the chain through the loop undo four stitches, thread the crochet loop through the loop on clasp, and then using your crochet hook make four more stitches.
5. Position clasp over fourth chain and fold the tail end of crochet towards rest of necklace. Using a darning needle carefully stitch the folded over section of four stitches to the chain below. I try to stitch up (towards clasp), and then back down (going through both sides of each of the four stitches). Weave your needle back up through this section so that it finishes by clasp. I use a thread Zap to melt away the excess cord * This tool is highly effective when it has new batteries and so I am careful to start melting the cord about ¼” away from where I want to finish! You could use scissors, but the advantage of a Thread Zap is that it melds your cord together, so no unravelling or loose ends sticking out. As a final touch I add a dab of hypo cement to the area just zapped, this may be overkill when using the Thread Zap, but I would do it for sure if you are using scissors. Repeat for other end of crochet chain.
6. Using flat nose and needle nose pliers attach the oval jump ring to the loop on top of tassel then connect to the midpoint of the necklace. Close jump ring being careful to line up edges of jump ring so there are no gaps.
7. You are now ready to try on your necklace and to admire your handiwork.
8. Enjoy!
Jewelry designed by Steph Stirniman at magpiecollectives.com
Related Articles
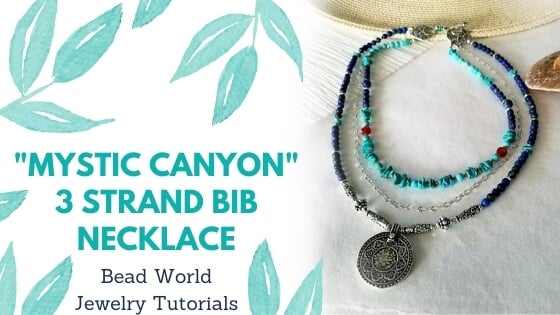
"Mystic Canyon" - 3 Strand Bib Necklace
"Mystic Canyon" - 3 Strand Bib Necklace This necklace reminds me of Arizona, the colors are searing blue...
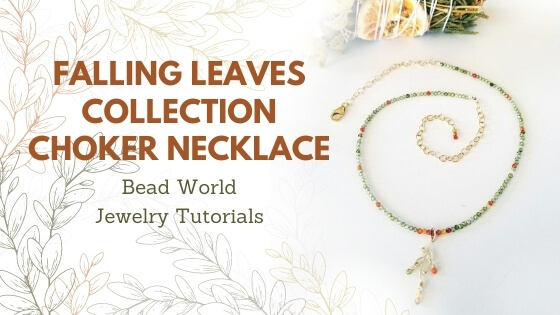
Falling Leaves Collection - Choker Necklace
Falling Leaves Collection - Choker Necklace Materials Needed: Length 14 -17.5” (with extension chain)...
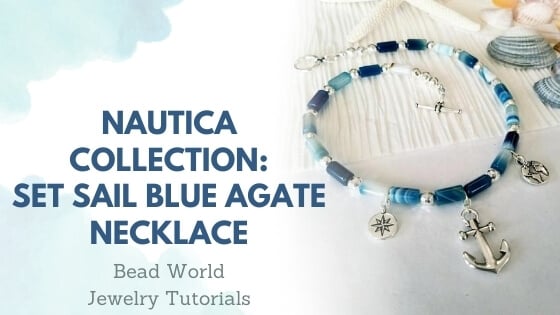
Nautica Collection – Set Sail Blue Agate Necklace
Nautica Collection – Set Sail Blue Agate Necklace Materials Needed: Finished Length 16 ½” * Can easily be...