

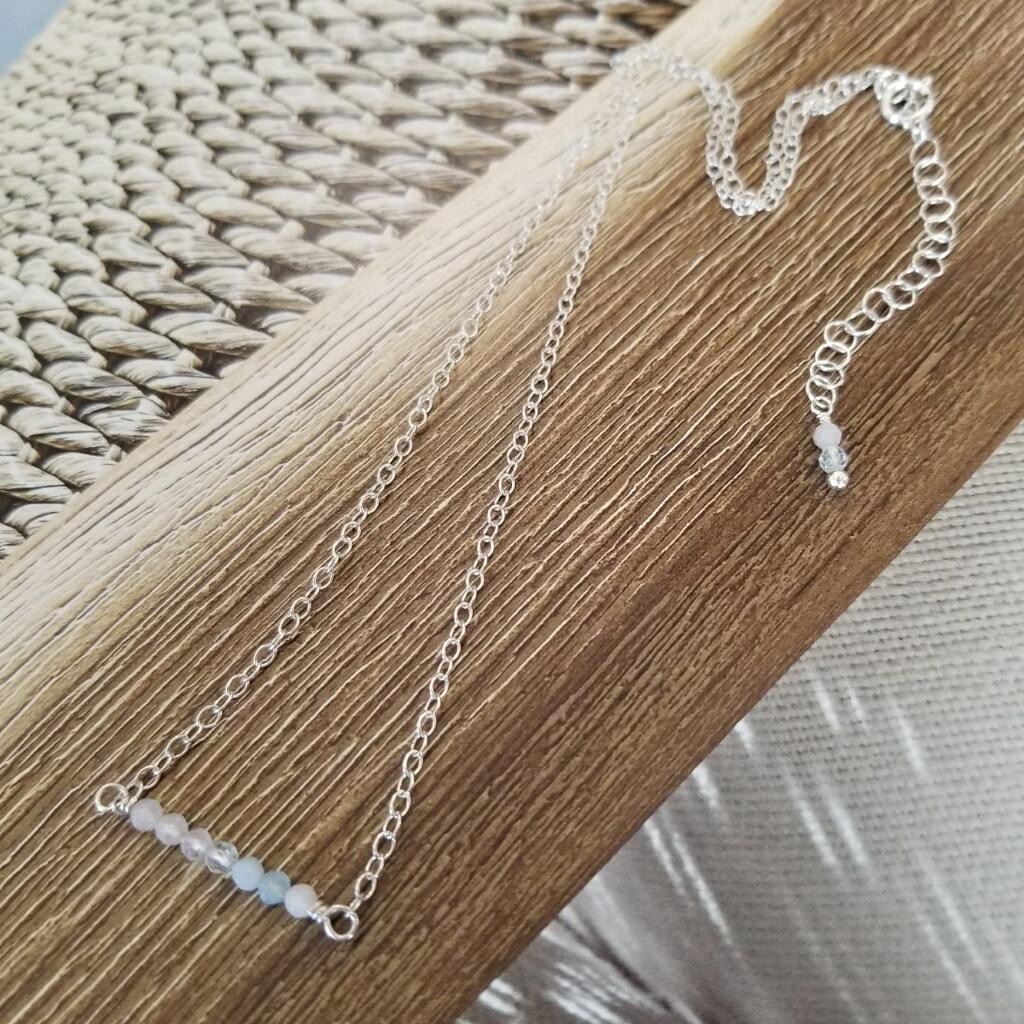
Morganite & Sterling Silver Bar Necklace
Morganite & Sterling Silver Bar Necklace
Materials Needed:
- 2mm Faceted Round Morganite (9) * Bar length can be made longer or shorter as you wish - 2 strands of beads will make complete set that includes this necklace, 3x wrap bracelet & earrings
- 3” Long 24g Sterling Silver Headpins (2)
- 2mm Sterling Silver Bead (1)
- 4mm Round 22g Sterling Silver Jump Ring (2)
- 6mm Spring Clasp * Or any small clasp of your choice
- 15” Delicate Sterling Silver Chain * Can add or subtract length depending on necklace length required
- 2.75” Sterling Silver Chain – For Extension Chain needs larger links to clasp into. * Option: can add or subtract depending on necklace length required
Length 16 -17.5” (with extension chain)
Tools Required
Sharpie
Instructions on Construction:
1. Using your wire cutters cut your 15” chain in half and put to the side.
2. Now we will start by making the central bar part of the necklace, so take a sharpie and draw a line across both prongs on your round nose pliers, close to the pointy ends. This will give you an accurate place to line up your wire every time you make a loop for the wire wrapping.
* Remember you can alter the placement of your ink mark depending on whether you want larger or smaller loops. These are small stones and so I created small delicate loops to go with them.
3. Next take a headpin and using your wire cutters remove the flat head plate. The central bar is a connector link with a loop on either end, this one has seven morganite beads in the middle. You will be using your needle and round nose pliers to make your wire wraps, start by making your first 90-degree bend approximately 1” from the end (this is the section that will form the loop & wrap so make sure that you have enough wire to work with). Now make the first small loop (using the sharpie mark on your round nose plier as a guide), but do not complete the wire wrap yet.
4. Thread the loop you have just made into the end link of one of the pieces of chain that you just cut, now only wrap your wire once and then leave this section for the time being.
* You may already know this tip, but if not prepare to learn something great!
Thread on 7 morganite, make your second loop and connect into the second section of chain. You can now wrap your wire once on this end of the bar. From here on out, take it in turns on both ends doing half a wire wrap at a time until you have filled the space and are ready to trim your wires. This allows you to have an equal number of wire wraps on either side of the beads, which is difficult to achieve if you complete the first loop and then do the second loop at the end. This will immediately take your finished pieces up a notch and give a more professional touch to your work.
5. Using your flat nose and needle nose pliers carefully open the jump ring and attach the chain to the clasp. Close jump ring so that edges come together, and it has no gaps.
6. Attach chain on second side to extension chain using jump ring, again closing carefully.
7. The final stage is to take another headpin and thread on 1 2mm silver bead and 2 morganite beads, make small loop, thread onto end of extension chain, complete the wire wrap and trim wire.
8. You are now ready to try on your necklace & to admire your handiwork.
9. Enjoy!
Jewelry designed by Steph Stirniman at magpiecollectives.com
Recent Posts
-

Dancing Pearl Cowboy Charm Leather Bracelet
Dancing Pearl Cowboy Charm Leather BraceletThis tutorial is a spin of our Dancing Gemstone Brac …17th Dec 2024 -

Christmas Wine Charms - Mini Tutorial
Christmas Wine Charms - Mini TutorialThese wine charms are sure to be the center talking point at yo …25th Nov 2024 -

Christmas Bow Garland - Mini Tutorial
Christmas Bow Garland - Mini TutorialCreate your own holiday decor with a Christmas-colored bow garl …14th Nov 2024