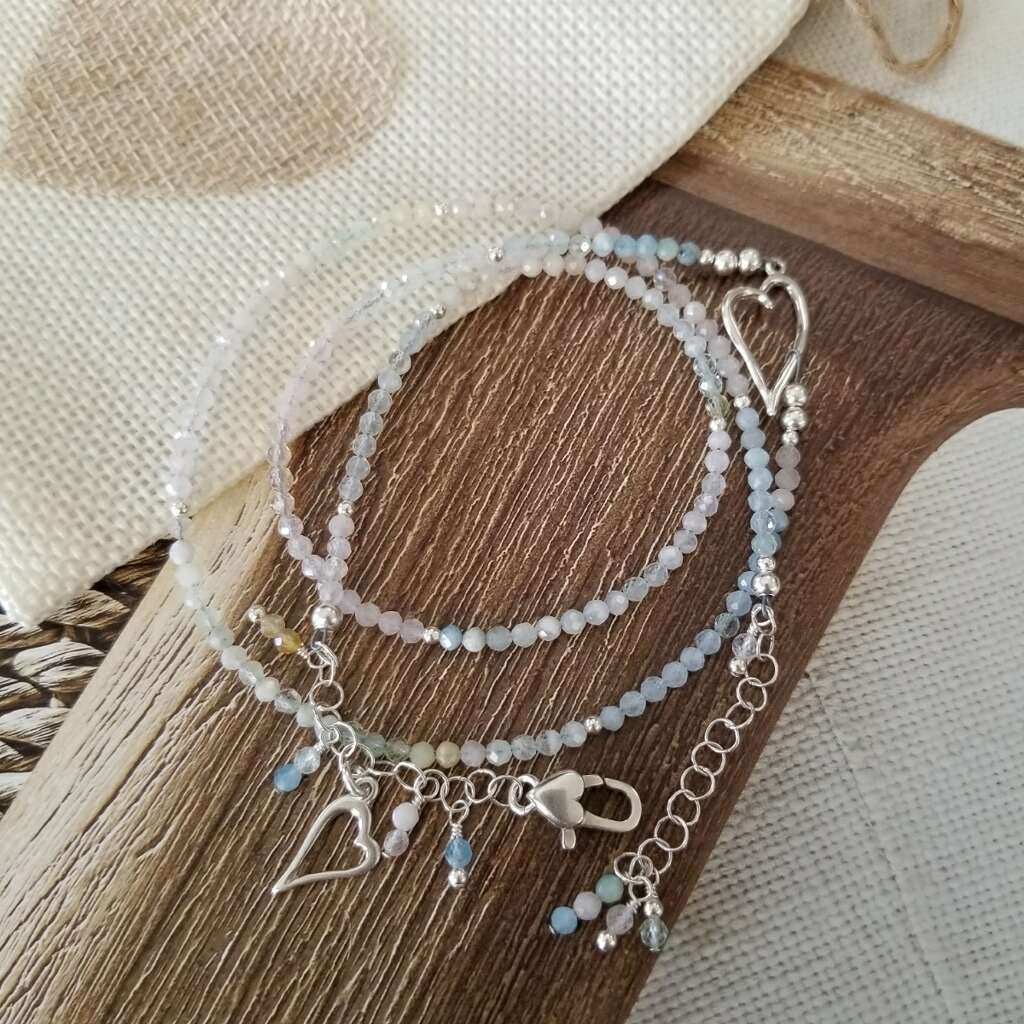
Morganite & Sterling Silver Triple Heart 3x Wrap Bracelet
Morganite & Sterling Silver Triple Heart 3x Wrap Bracelet
 Materials Needed:
- 2mm Faceted Round Morganite (2 strands will make necklace, bracelet & earrings – you will need approx. 1 ½ strands for the bracelet alone)
- Amoracast Sterling Silver Heart (1) – Used as connector
- Amoracast Sterling Silver Medium Heart (1) – Used as dangle
- Sterling Silver Heart Lobster Claw Clasp (1)
- 3mm Sterling Silver Crimp Covers (4)
- Soft Touch Beading Wire, Fine, Satin Silver Color (approx. 2ft used)
- 3mm Sterling Silver Beads (2) * Come in packets of 20
- 2mm Sterling Silver Beads (17) * Come in packets of 50
- Delicate Sterling Silver Chain with links large enough to clasp into 2 ½” Used * Can use more if making larger sized bracelet
- 1.5” 26g Sterling Silver Headpins (8)
- 2mm x 1mm Sterling Silver Crimps (4)
- 4mm Round 22g Sterling Silver Jump Ring (1) * To attach small heart dangle
Finished Length 21"
Tools Required
Instructions on Construction:
1. Cut two 13” lengths of beading wire, there is a heart connector in the middle of bracelet that will have a beading wire attached on either side. Cut your chain in half so that you have two pieces that are 1 ¼” long (if you need a larger size bracelet you can make these chain sections longer to accommodate your wrist size).
2. Take one of the pieces of beading wire and thread on crimp tube & attach to the last link in one of the sections of chain. You can use the flat crimp method, using your needle nose pliers to close crimp. Trim the excess wire (using flex cutter), then cover the crimp with a 3mm crimp cover using the same pliers
***Please remember to keep your wires parallel when crimping, this makes for a more secure attachment & it’s also wise to give a test pull on your wire to make sure you have closed down hard enough on the crimp :)
3. Attach the clasp to other end of this section of chain using your needle nose and flat nose pliers to open jump ring. The sterling silver clasp comes with a jump ring attached. You will work on attaching the dangles to this section of chain at the end of the project.
4. * The beads on these strings of morganite come in sections of pink, yellow, blue, and white. On this side of bracelet there are 80 morganite, 6 2mm silver and 1 3mm silver beads, I found it helpful to decide which color I wanted closest to the heart connector and then working back from there. I suggest you lay your morganite beads out on a beading mat and decide on the color sequence most pleasing to you, keeping in mind the number of beads needed to achieve this length bracelet. I used the 6 2mm silver beads randomly, but between changes in color. Just remember to finish with 1 2mm silver and 1 3mm silver. You are now ready to start threading beads to this first section of wire.
5. When all beads are threaded on to the beading wire add the crimp tube and thread through the ring on the medium size heart (the smaller heart will be used as a dangle). Flat crimp and use crimp cover in the same way that you started this section.
*Remember to leave a little slack in your wire so that the beads sit nicely, if you crimp your wire too close to the last bead, it will make the stringing too rigid & the wire may break!
6. The second piece of beading wire is attached to the pointy end of the heart making sure that the loop is large enough to accommodate the point. Attach wire and use crimp cover in the same way as previously done.
7. This side of bracelet also has 80 morganite, 6 2mm silver and 1 3mm silver bead, again choose which color section you would like to see next to the heart and lay your color sequence out on your bead mat.
8. Remember to start your threading sequence with 1 3mm silver bead and then 1 2mm silver bead and then when threading is complete add your crimp tube and attach to the second section of chain in the same way that you started the bracelet. Make sure you also allow a little slack in this second side of stringing and then add your final crimp cover.
9. You are now ready to make the dangles that attach to the two sections of chain. Start by taking a sharpie and drawing a line across both prongs on your round nose pliers, close to the pointy ends. This will give you an accurate place to line up your wire every time you make a loop for the wire wrap dangles.
* Remember you can alter the placement of your ink mark depending on whether you want larger or smaller loops, these are small stones and so I created small delicate loops to go with them.
10. On clasp side section of chain: find the mid-point and use a jump ring to attach the small heart dangle into a link. There are two wire wrapped dangles attached to the chain on either side of this heart, giving a total of five dangles. To make the first dangle take a headpin add 1 2mm silver and 2 morganite beads then wire wrap and attach into a link close to the crimp cover, finish your wire wrap. For second dangle add 2 morganite beads to a headpin and wire wrap into a link between first dangle and heart. For third dangle it is the same set up as second dangle, only this time you attach into chain on other side of heart. The final dangle has 1 2mm silver and 1 morganite bead and is attached to chain between the last dangle and clasp.
11. On second section of chain: Take headpin and add 1 2mm silver and 1 morganite bead, wire wrap this to link in chain closest to the crimp cover. There are three dangles attached to the very last link in the chain, they are as follows #1 has 3 morganite, #2 has 1 2mm silver and 1 morganite, #3 has 1 morganite and 1 2mm silver bead. The dangles on this side of the bracelet are laid out in this manner to allow plenty of link options for the clasp to close into.
12. You are now ready to try on your bracelet & to admire your handiwork.
13. Enjoy!
Jewelry designed by Steph Stirniman at magpiecollectives.com
Recent Posts
-
Dancing Pearl Cowboy Charm Leather Bracelet
Dancing Pearl Cowboy Charm Leather BraceletThis tutorial is a spin of our Dancing Gemstone Brac …17th Dec 2024 -
Christmas Wine Charms - Mini Tutorial
Christmas Wine Charms - Mini TutorialThese wine charms are sure to be the center talking point at yo …25th Nov 2024 -
Christmas Bow Garland - Mini Tutorial
Christmas Bow Garland - Mini TutorialCreate your own holiday decor with a Christmas-colored bow garl …14th Nov 2024


