

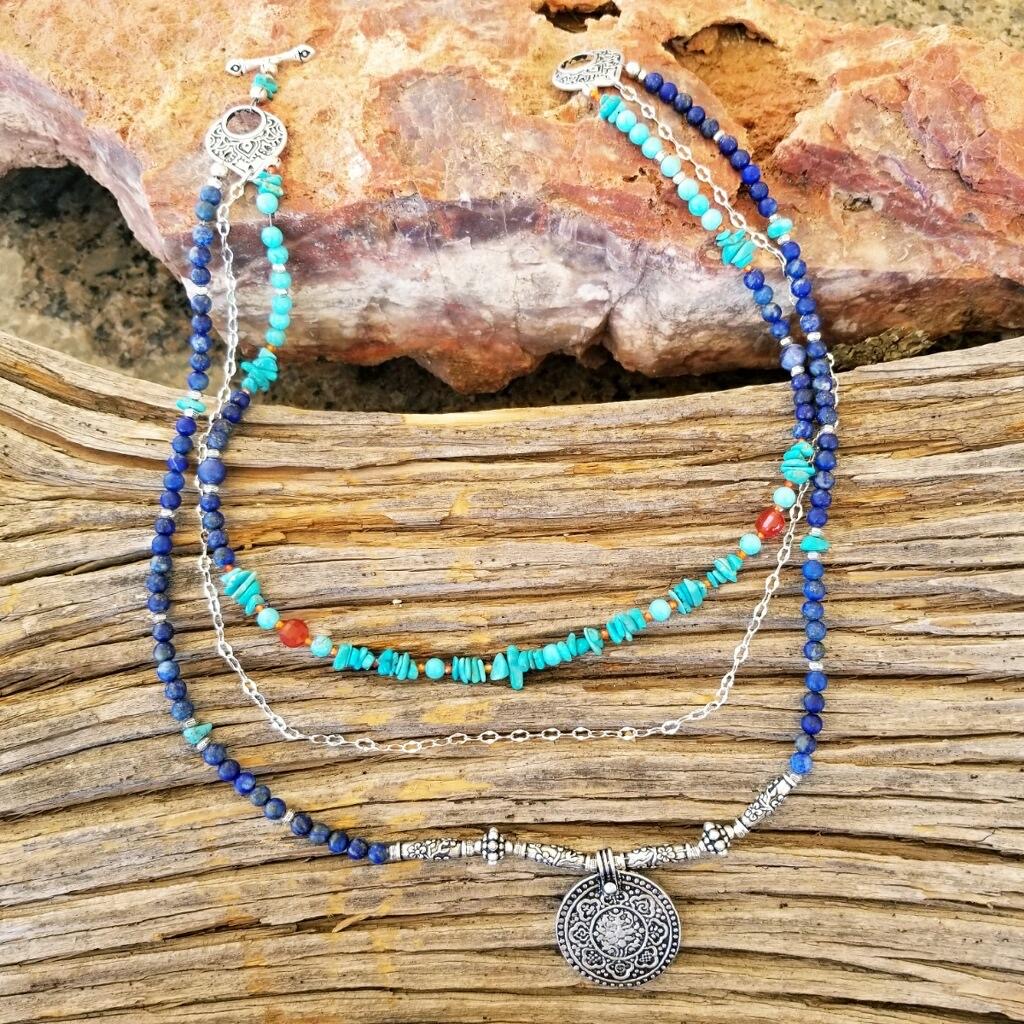
"Mystic Canyon" - 3 Strand Bib Necklace
"Mystic Canyon" - 3 Strand Bib Necklace
This necklace reminds me of Arizona, the colors are searing blue skies and red rock canyons which gives it a very South Western feel. This necklace and the rest of the collection feature many TierraCast findings (a cool Californian company that produces quality products). I have included an “Eight Signs” pendant that represents power and renewal in numerology… see if it works for you!
Materials Needed:
- TierraCast (TC) Temple Toggle Bar & Eye, Silver Plated (1)
- TC: Temple Link, Silver Plated (1)
- TC: Pamada Bead, Silver Plated (2)
- TC: Wild Rose Barrel Bead, Silver Plated (4)
- TC: 3mm Faceted Bead, Silver Plated (34)
- TC: Eight Signs Charm, Silver Plated (1)
- Soft Touch Beading Wire – Fine (Approx. 4’) * Needs to be Fine enough to fit through the 2mm Zircon
- 2 x 2mm Sterling Silver Crimps (6)
- 4mm Crimp Covers, Antique Silver (6)
- Silver Plated 4.25mm Crimped Oval Chain (16”)
- Medium Oval Jump Rings, Rhodium Plated (2)
- 4mm Lapis Natural Matte Round (1 strand – 86)
- 6mm Sodalite Matte (2)
- 6mm Carnelian Faceted Coin (2)
- 5-8mm American Turquoise Chips (73)
- 4mm Matte Round Howlite Turquoise (21)
- 2mm Orange Zircon Crystal Faceted Round (27)
Finished Length Approx. 21” lower strand
Tools Required
Optional:
* These are especially handy when working on bead layouts, they have channels to place your beads in & are marked in inch increments from center front & back.
Key Code for Beads: You can lay your beads out on mat with A – J labels next to them to make it easier for stringing in correct sequence. * If you have a bead board you can lay the beads in correct sequence before stringing, this may be the easiest option. A = 3mm TC Fac. Silver Bead B = 4mm Lapis C = Turquoise Chips D = TC Wild Rose Barrel Bead E = TC Pamada Bead F = TC “Eight Signs” Pendant G = 2mm Zircon H = 4mm Howlite I = 6mm Carnelian J = 6mm Sodalite
Instructions on Construction:
1.Lower Strand: Cut a 24’ piece of fine bead wire using Soft Flex Cutter. Thread your crimp & attach to the outside of the three holes in toggle clasp, this is going to be the longest strand on the necklace so make sure that you connect it to the lowest hole in the clasp.
*The clasp is slightly dome-shaped, the domed side is the correct way up. Use your needle nose pliers to make a flat crimp, the crimp is then covered with a crimp cover
*Keep your wires parallel when crimping, this makes for a more secure attachment, give a test pull on your wire to make sure you have closed down hard enough on the crimp.
2.String beads as follows: A (1), B (5),* do this twice, A (1), C (1), A (1), B (5), * do this three times, A (1), C (1), A (1), B (5) , * do this twice, A (1), D (1), A (1), E (1), A (1), D (1), A (1), F (1) this is the central point of the necklace. The second half is a mirror image of the first side.
3.When all beads are strung add crimp & attach to the lower hole in the TC Temple link (this piece is the same as the clasp, it just comes without the toggle bar). Remember to leave enough slack so that you can add a crimp cover and your beads can hang in a fluid manner.
4.Middle Strand: Open an oval jump ring (using the flat nose and needle nose pliers) and then connect the 16” length of chain to the middle hole in the clasp. Close the jump ring being careful that both sides come together securely. Repeat this attaching the other end of the chain to the middle hole in the Temple link.
5.Top Strand: Cut a 21’ piece of bead wire using Soft Flex Cutter. Thread your crimp & attach to the top hole in the clasp. Use your needle nose pliers to make a flat crimp, the crimp is then covered with a crimp cover.
6.String beads as follows: G (1), C (3), H (3), A (1), H (1), A (1), H (3), G (1), C (5), G (1), B (4), A (1), J (1), A (1), B (4), G (1), C (5), G (1), H (1), G (1), I (1), G (1), H (1), G (1), C (5), G (1), C (5), G (1), H (1), G (1), C (5), G (1), C (5), Center Point H (1). The second half of stringing is a mirror image of the first side.
7.When all beads are strung add crimp & attach to the top hole in the TC Temple link. Remember to leave enough slack so that you can add a crimp cover and your beads can hang in a fluid manner.
8.The final step is to attach the toggle bar to the link. If you are right-handed you will be attaching to the link on the right side (when necklace is held as though you are wearing it – domed links facing out!). If you are left hand dominant you will be attaching to the left link.
9.Cut approx. 4” wire, thread on crimp tube and attach to the cut-out in link, thread back through crimp tube and close securely. Place a crimp cover, thread on C (3), G (1), add crimp tube attach to loop on toggle bar and place final crimp cover.
10.You are now ready to try on your new necklace & to admire your handiwork.
11.Enjoy!
Jewelry designed by Steph Stirniman at magpiecollectives.com
Recent Posts
-

Christmas Bow Garland - Mini Tutorial
Christmas Bow Garland - Mini TutorialCreate your own holiday decor with a Christmas-colored bow garl …14th Nov 2024 -

Charm Necklace Tutorial
Charm Necklace TutorialEmbrace individuality with our Personalized Charm Necklace tutorial, a perfec …6th Nov 2024 -

Double Loop Peyote Earrings
Double Loop Peyote EarringsLearn all about creating a seed bead circle using the peyote stitch techn …21st Oct 2024