

“Sweet Summer Flowers” Kumihimo Bar Bracelet
“Sweet Summer Flowers” Kumihimo Bar Bracelet
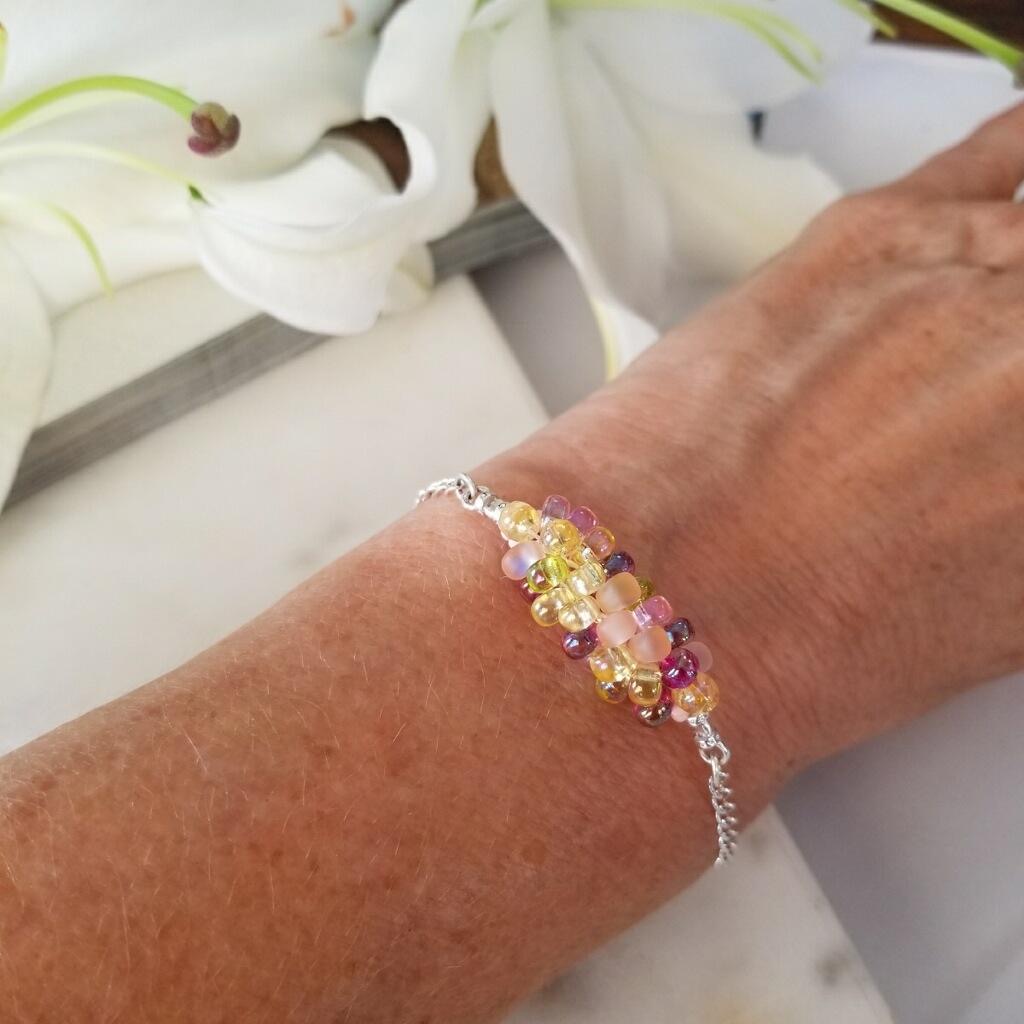
The sweet colors in this bracelet include pink, berry, chartreuse, white & pale lemon with a mix of frosted, matte & ab finishes. It is so pretty, in a “floral straw hat” kind of way, and there is a vintage charm to the mix. There are so many great colors to choose from so work with your favorite colors or make a variety of bracelets and see where this pattern takes you!
*** Finished Length determined by wrist size, this looks best when fitted snug to wrist & then the beaded section stays in place. The E Bracelet Sizer tool makes quick work of getting a good fit. *** You could use the medium weight S-Lon & this will give you a firmer braid, but the micro cord gives more flex to the beaded bar which lets it fit to your wrist better. If you use medium weight cord you will need to use 3mm Leather Crimp Ends (see below).
Materials Needed:
- (12’) Macrame Cord, S-Lon Micro Cord, Color – White (or whatever color works with your bead choice)
- 4mm Magatamas – Tango Mix (1 Tube – 40 used, approx. 122 in tube)
- Size 11 Miyuki Seed Beads # 2036 Opaque Light Tea Rose Matte (1 Tube – 16 used)
- 6” Small Link Silver Plated Chain (or Silver Chain of your choice) *** 4 1/2” was used in this bracelet which fits a 6 ¼” wrist
- Small Oval Jump Rings, Silver Plated (1 Packet – 4 Used)
- 1.5mm Silver Plated Leather Crimp Ends (1 Packet – 2 pairs in packet) *** Optional: 3mm Silver Plated Leather Crimp Ends if using the medium thickness macramé cord. (1 packet- 2 pairs in packet)
- Silver Plated Medium Size Magnetic Clasp (1)
Tools Required
Round (or Mini) Kumihimo Braiding Disk
Kumihimo Weight Optional
8 x Bobbins (for holding macramé cord)
Flat Nose Pliers *Either need two flat nose pliers, or one flat and one needle nose for undoing jump rings)
Needle Nose Pliers (also known as chain nose)
Optional: Triangle Bead Scoop, helpful in moving beads around the bead mat & useful when counting beads
Instructions on Construction:
*** When making a kumihimo braid try to keep your weight centered in the hole & make sure that it is hanging because if it is resting on any surface it cannot act as a weight and your tension will start to look strange.
*** If you have to put your braid down & walk away remember to leave it with three strands in the bottom position, that way you will always know to start when you resume working on it.
*** Keep a tall tumbler/cylinder handy, if you leave your work you can place the disk on top of the tumbler and everything stays neat. *** Keep an eye on your work as you go that way you can correct any mistakes sooner than later. If you look at the braid and something looks strange (tension or missing bead maybe) you can reverse the flow of work and that will undo your braid, you can go back to the mistake and correct it. This means you will go from top left to bottom left, bottom right to top right and then turn ¼ turn clockwise and repeat. Give it a try, it works!
1. Cut the 12’ of macramé cord into eight 18” lengths. Tie all eight macramé cord tails together using an overhand knot (like tying a balloon).
2. On one cord, string 1 x size 11 seed bead, 5 x magatama mix (randomly selected), 1 x size 11 seed bead and tie a double knot at the end of the strand to act as a stopper. Repeat this with the other seven cords.
3. Since these are short cords and you are only using a small number of beads it is not necessary to use bobbins for this project, unless you are like me and prefer to! I have allowed enough cord that you can wind onto the bobbins and this keeps everything neat and easy to use.
4. Place the eight-strand knot into the hole in the center of the kumihimo disk and position the cords around the disk using the four dots as guides (one cord to each side of the dots). Slide a cord into each of the eight notches, pull the cords tight and clip the weight to the knot.
5. Begin kumihimo by moving the cord at the top right (between 32 & 1) to the bottom right (between 14 & 15). Move the cord at bottom left (between 16 & 17) to the top left (between 30 & 31). Pull all four cords very tight as this will keep a good tension.
6. Rotate the entire kumihimo disk counterclockwise ¼ turn. Move the cord at the top right (between 8 & 9) to the bottom right (between 22 & 23), move the cord at the bottom left (between 24 & 25) to the top left (between 6 & 7). Pull all four cords very tight. Repeat until you have about 1/4 – 1/2” of a kumihimo braid.
7. Now the fun begins & it’s time to add beads. You will be repeating the previous instructions but this time when you move the cord from the notch, slide one bead from that cord towards the center braid. You will slide the bead underneath the first cord that you cross over (this locks the bead into place) the cord will go to the same position that you have been doing. *** It does help if your tension is tight, as it is easier to slide the bead under a taught strand). Remember to move cord from top right to bottom right, then bottom left to top left, rotate disk ¼ turn counterclockwise and repeat. The magatamas lock in the same way as the seed beads, just make sure that the pointy end is facing out.
8. Repeat step 7 adding a bead each time you move the cord until all beads are used. Repeat steps 5 and 6 creating a braid that is just cord (the same as beginning). Unclip the weight and gently remove all eight cords from the kumihimo disk. Read instructions below & then tie the ends in an overhand knot as needed.
*** Different people will make varying size cord depending on their tension. If it looks like it will be a snug fit, I leave two of the cords out of the overhand knot above & don’t burn them with the thread zapper. This leaves me something to thread through the crimp & gives some leverage to pull braid into place. I have found this a useful trick to remember. If the cord looks a little small for the crimp (and I don’t have any other crimps available) I may keep the knot to bulk it up a little & then burn off six of the cords just behind the knot, leaving two cords as mentioned above, to pull the cord into place.
9. Use a thread zapper to cut the knot (as needed) off each end, melting the ends and securing the braid. Thread the braid into the crimp making sure that the end of cord is flush with the end of crimp (side with the loops on). Using the points of your needle nose pliers go to the mid-section of crimp and apply pressure to secure crimp to cord. This is a two-part process, you will need to come from either side of the crimp and be sure to apply enough pressure that the crimp will hold the cord firmly and not come loose. *** You may want to try sterling silver crimps with future projects, just remember they do not take as much muscle to close. If you have two cords still attached to braid you can now remove these with your thread zapper.
10. The chain used in this bracelet was cut in 2 x 2 1/8” sections and this fits a 6 ¼” wrist. If you need larger or smaller size add or decrease chain length here, use your wire cutters to cut chain. Use two flat end pliers (or one flat & one needle nose) to open the jump rings used to attach the crimp ends to chain, then attach the other ends of chain to the magnet. *** The magnet will want to attach to your pliers so this can be a little tricky but do this and you are finished!
11. Try on your new bracelet & admire your handiwork!
12. Enjoy!
Jewelry designed by Steph Stirniman at https://magpiecollectives.etsy.com/
Recent Posts
-

Dancing Pearl Cowboy Charm Leather Bracelet
Dancing Pearl Cowboy Charm Leather BraceletThis tutorial is a spin of our Dancing Gemstone Brac …17th Dec 2024 -

Christmas Wine Charms - Mini Tutorial
Christmas Wine Charms - Mini TutorialThese wine charms are sure to be the center talking point at yo …25th Nov 2024 -

Christmas Bow Garland - Mini Tutorial
Christmas Bow Garland - Mini TutorialCreate your own holiday decor with a Christmas-colored bow garl …14th Nov 2024