
Tutorials
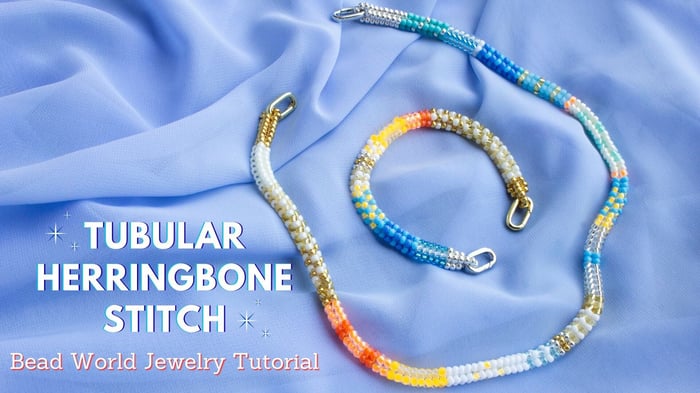
How to: Tubular Herringbone Stitch Bracelet and Necklace
How to: Tubular Herringbone Stitch Bracelet and Necklace
Learn to create these flowing, color-blocked beaded designs using the tubular herringbone stitch. Once you've mastered the bracelet technique, you'll be able to apply the same skills to the included necklace pattern.
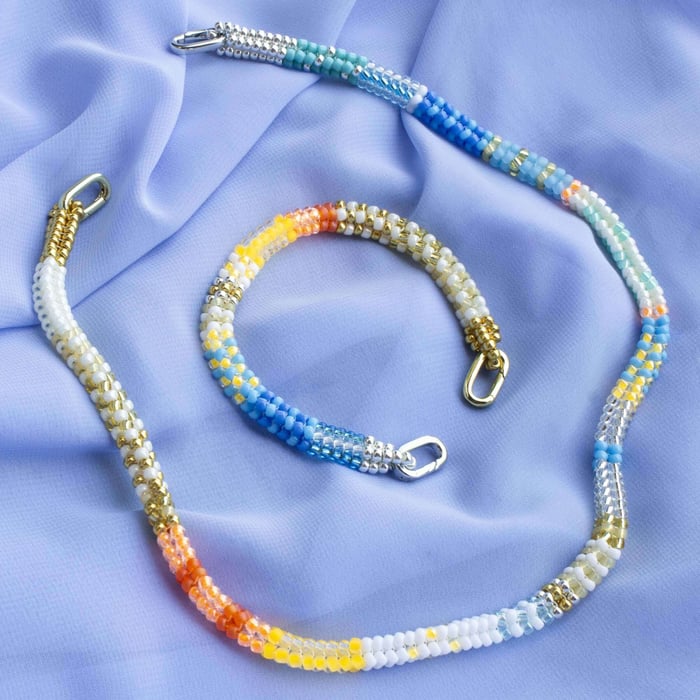
The bracelet pattern blends warm yellows and oranges into soft blues, while the longer necklace carries the palette across creamy whites, gold, coral, and aqua tones. Both pieces use the same core technique, so the bracelet serves as your practice run before tackling the longer length.
Suitable for confident beginners who are comfortable holding a needle and thread (please use caution!). Some basic bead weaving experience is helpful but not required.
Shop Size 8 Japanese Seed Beads
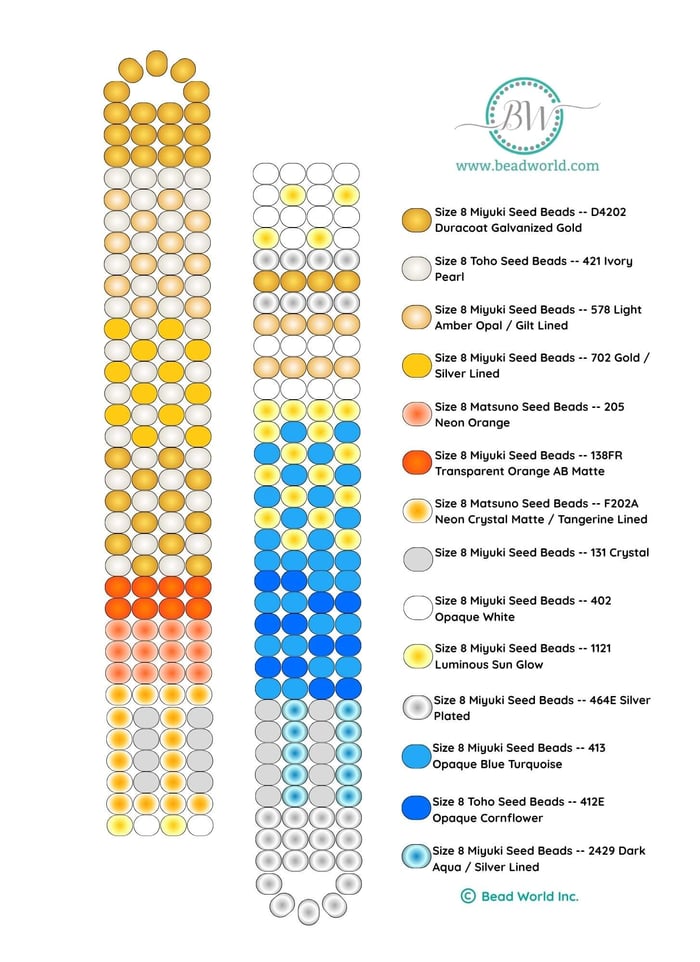
Bracelet Materials Needed: (Bracelet length is 7.25")
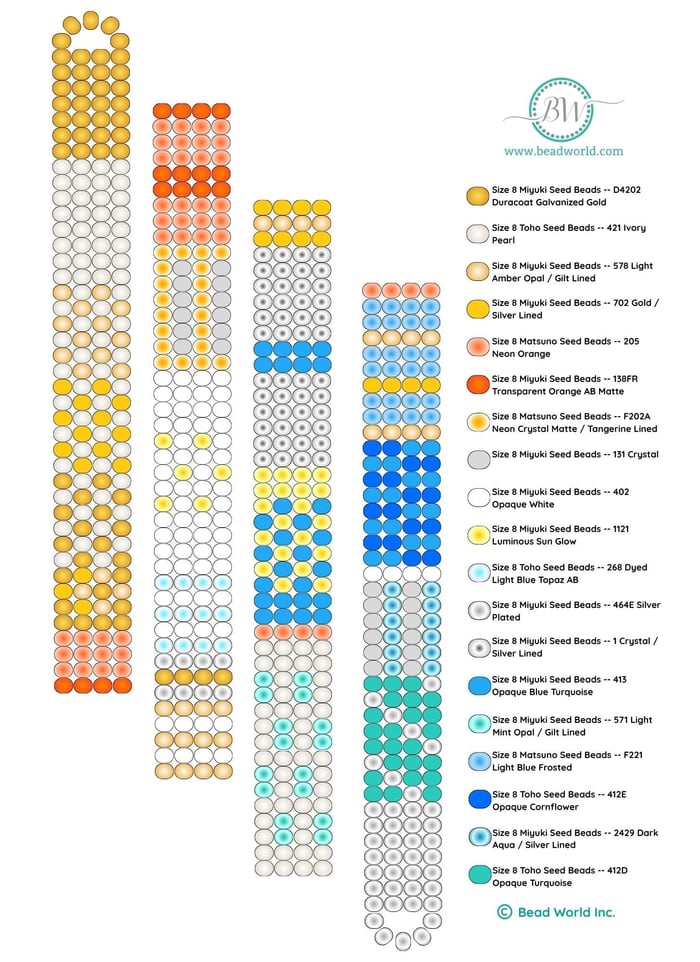
- Size 8 Miyuki Seed Beads -- D4202 Duracoat Galvanized Gold
- Size 8 Toho Seed Beads -- 421 Ivory Pearl
- Size 8 Miyuki Seed Beads -- 578 Light Amber Opal / Gilt Lined
- Size 8 Miyuki Seed Beads -- 702 Gold / Silver Lined
- Size 8 Matsuno Seed Beads -- 205 Neon Orange
- Size 8 Miyuki Seed Beads -- 138FR Transparent Orange AB Matte
- Size 8 Matsuno Seed Beads -- F202A Neon Crystal Matte / Tangerine Lined
- Size 8 Miyuki Seed Beads -- 131 Crystal
- Size 8 Miyuki Seed Beads -- 402 Opaque White
- Size 8 Miyuki Seed Beads -- 1121 Luminous Sun Glow
- Size 8 Miyuki Seed Beads -- 464E Silver Plated
- Size 8 Miyuki Seed Beads -- 1 Crystal / Silver Lined
- Size 8 Miyuki Seed Beads -- 413 Opaque Blue Turquoise
- Size 8 Toho Seed Beads -- 412E Opaque Cornflower
- Size 8 Miyuki Seed Beads -- 2429 Dark Aqua / Silver Lined
- One G Thread - Cream (8 feet)
- Tulip Beading Needles Size #12 (1) (John James #12 work as well)
- 18K Gold Plated 14x8mm Spring Gate Ring Oval (1)
- Platinum Plated 14x8mm Spring Gate Ring Oval (1)
Necklace Materials Needed: (Bracelet length is 17")
- Size 8 Miyuki Seed Beads -- D4202 Duracoat Galvanized Gold
- Size 8 Toho Seed Beads -- 421 Ivory Pearl
- Size 8 Miyuki Seed Beads -- 578 Light Amber Opal / Gilt Lined
- Size 8 Miyuki Seed Beads -- 702 Gold / Silver Lined
- Size 8 Matsuno Seed Beads -- 205 Neon Orange
- Size 8 Miyuki Seed Beads -- 138FR Transparent Orange AB Matte
- Size 8 Matsuno Seed Beads -- F202A Neon Crystal Matte / Tangerine Lined
- Size 8 Miyuki Seed Beads -- 131 Crystal
- Size 8 Miyuki Seed Beads -- 402 Opaque White
- Size 8 Miyuki Seed Beads -- 1121 Luminous Sun Glow
- Size 8 Toho Seed Beads -- 268 Dyed Light Blue Topaz AB
- Size 8 Miyuki Seed Beads -- 464E Silver Plated
- Size 8 Miyuki Seed Beads -- 1 Crystal / Silver Lined
- Size 8 Miyuki Seed Beads -- 413 Opaque Blue Turquoise
- Size 8 Miyuki Seed Beads -- 571 Light Mint Opal / Gilt Lined
- Size 8 Matsuno Seed Beads -- F221 Light Blue Frosted
- Size 8 Toho Seed Beads -- 412E Opaque Cornflower
- Size 8 Miyuki Seed Beads -- 2429 Dark Aqua / Silver Lined
- Size 8 Toho Seed Beads -- 412D Opaque Turquoise
- One G Thread - Cream (20 feet) - you may use smaller sections of thread and tie them together as you go so you can have a more workable amount
- Tulip Beading Needles Size #12 (1) (John James #12 work as well)
- 18K Gold Plated 14x8mm Spring Gate Ring Oval (1)
- Platinum Plated 14x8mm Spring Gate Ring Oval (1)
Tools Needed
Pattern:
Instructions on Construction - Bracelet:
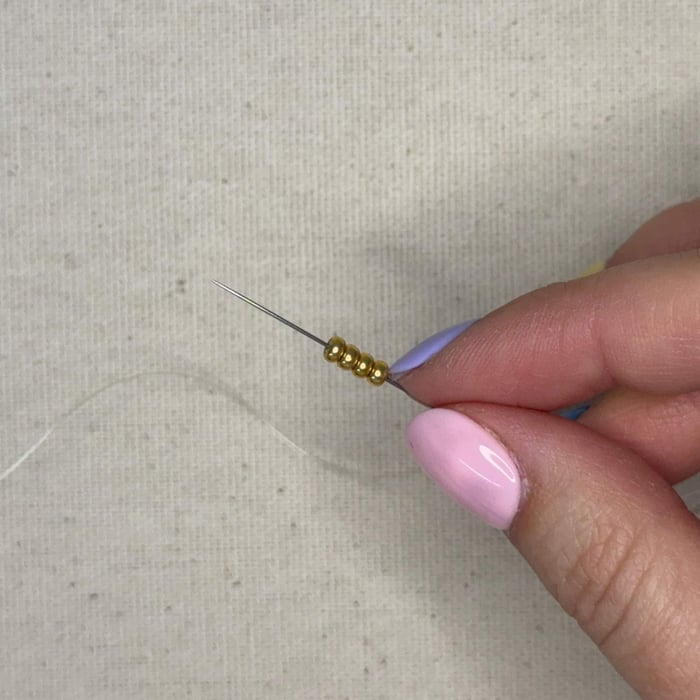
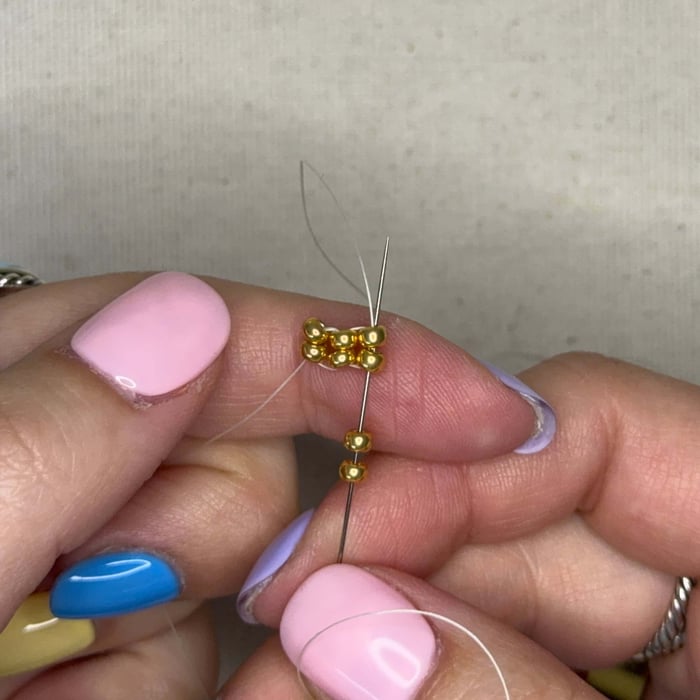
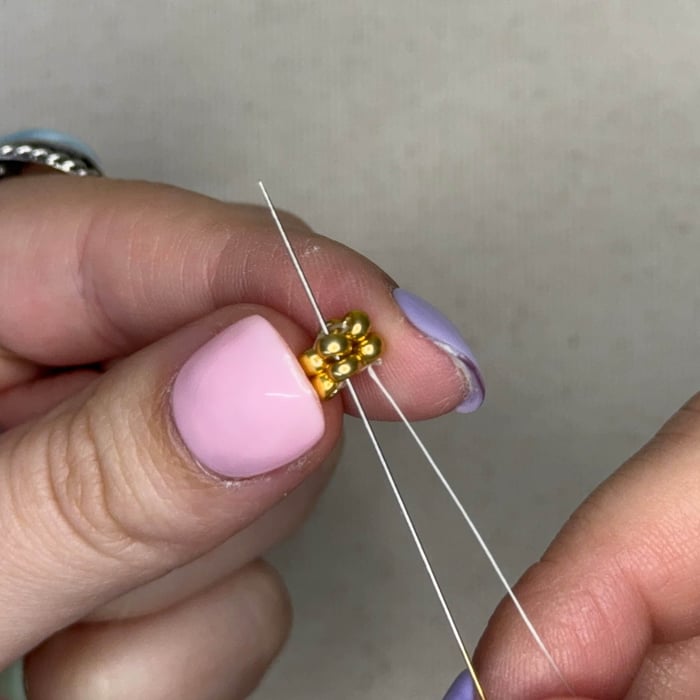
1. Cut 8 feet of One G thread and thread one end through the eye of your needle. Pick up 4 gold seed beads using your needle
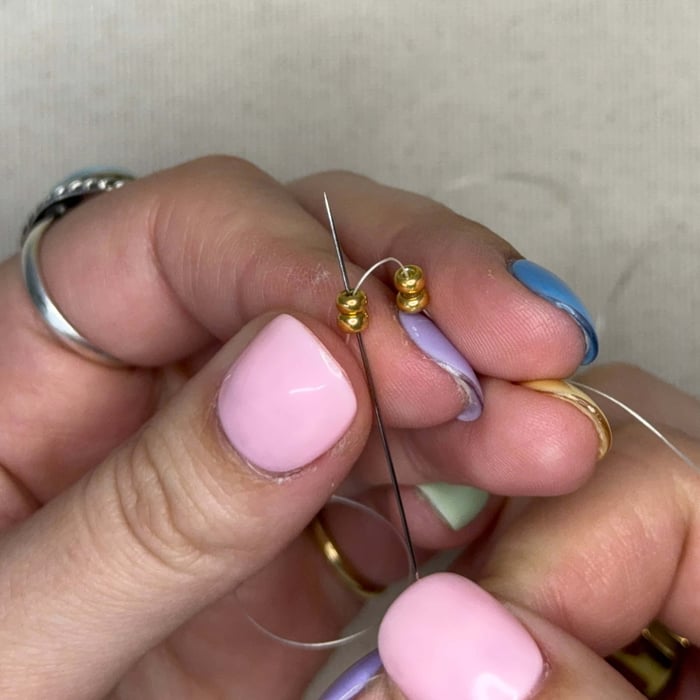
2. Pull those 4 seed beads down towards the other end of your thread - leaving about 2-3 inches. Poke your needle through the first two beads shown (closest to the thread tail)
3. Pull the thread tight and the 4 beads should now be lined up 2x2. Thread your needle down the two beads without thread coming out each side. Follow the arrow.
4. Now we will add 2 more gold beads and loop around threading your needle through the previous 2 beads
5. And then back through to secure
6. Add 2 more beads, looping through the 2 previous beads

7. And then loop back through to secure
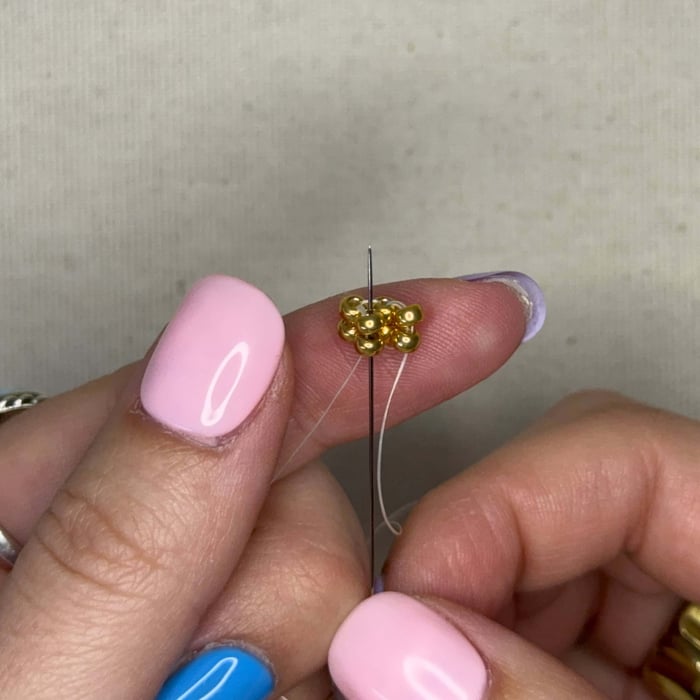
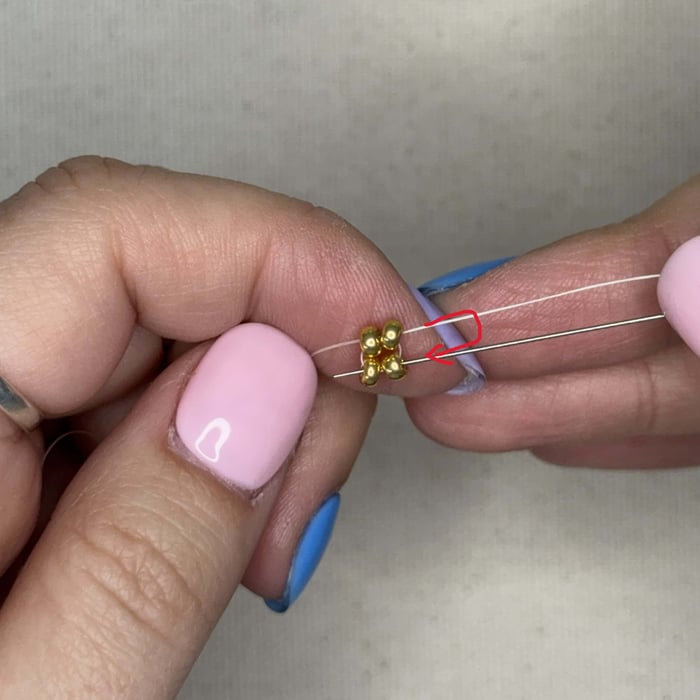
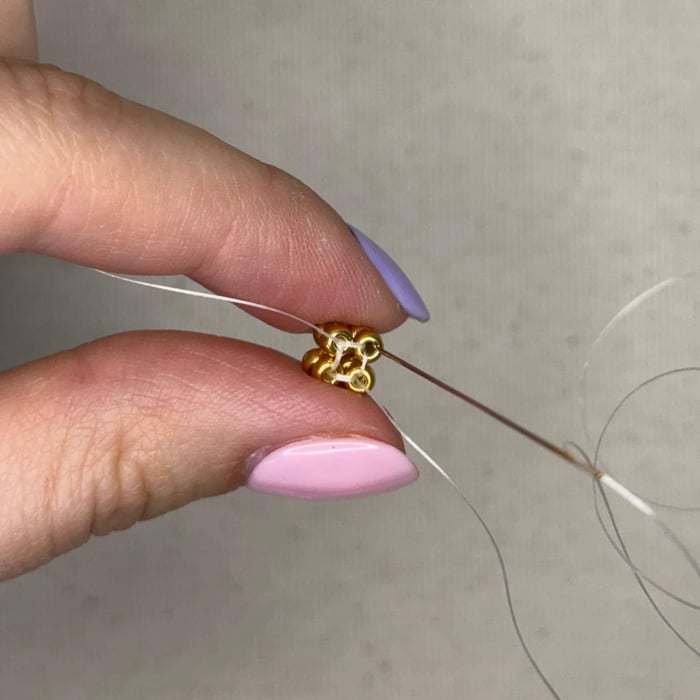
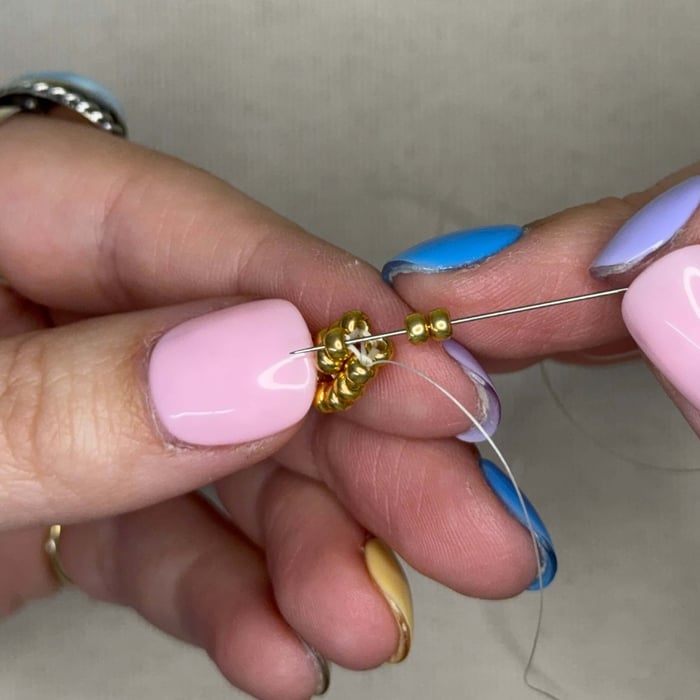
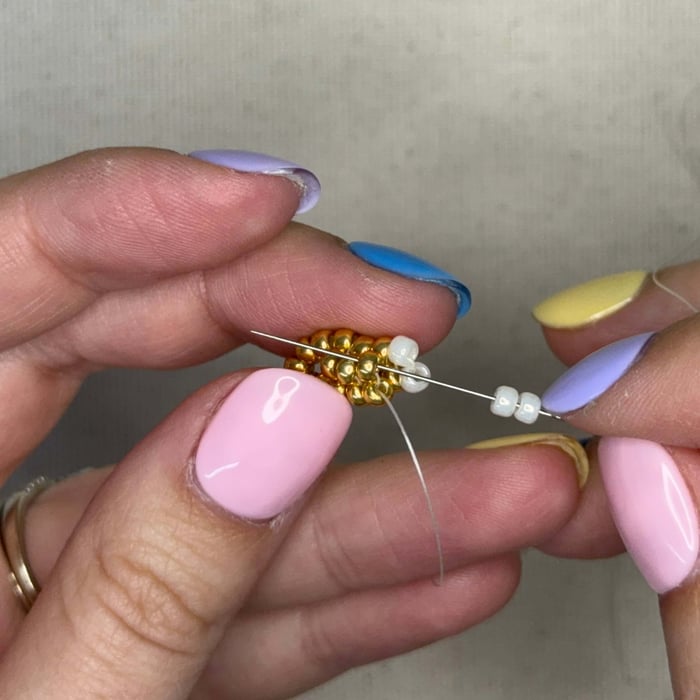
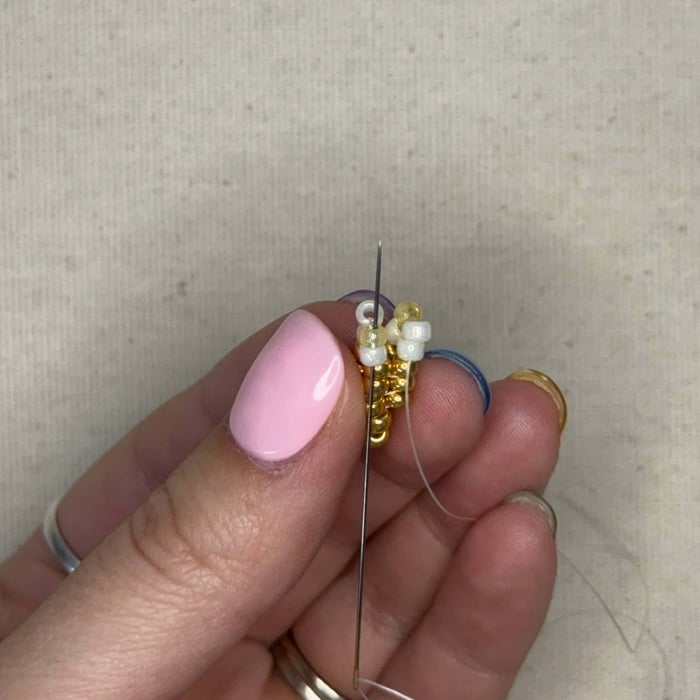
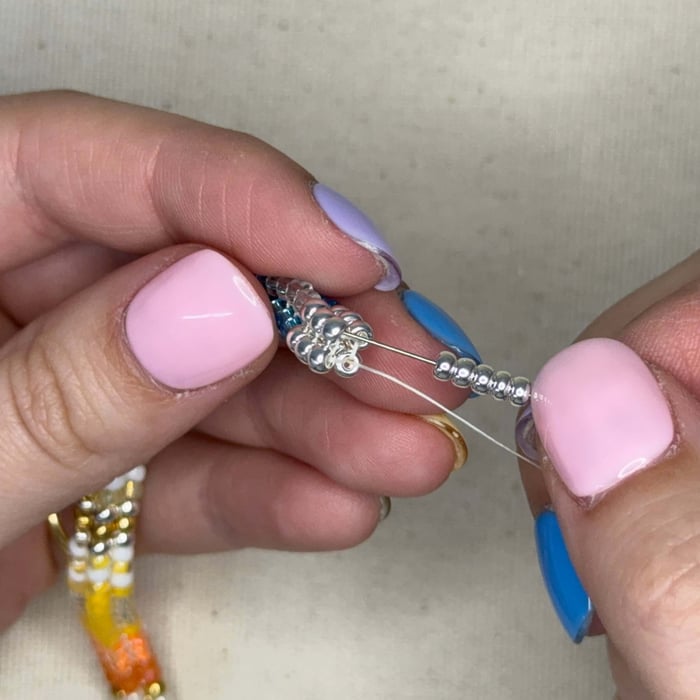
8. Now we will fold all 4 rows of 2 together to create a cube and then thread your needle up through the first two beads where the thread tail is coming out
9. Thread back through the previous 2 beads
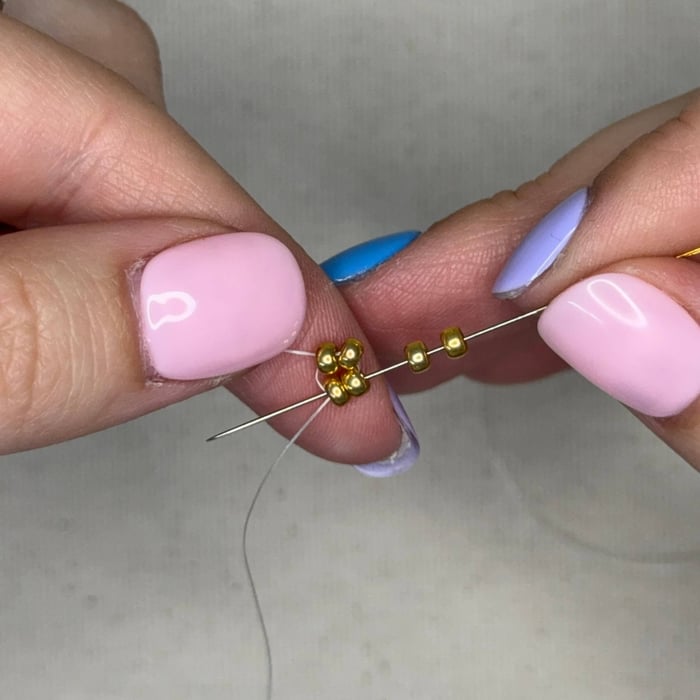
10. Pull tight and use the thread tail to tie two surgeon knots
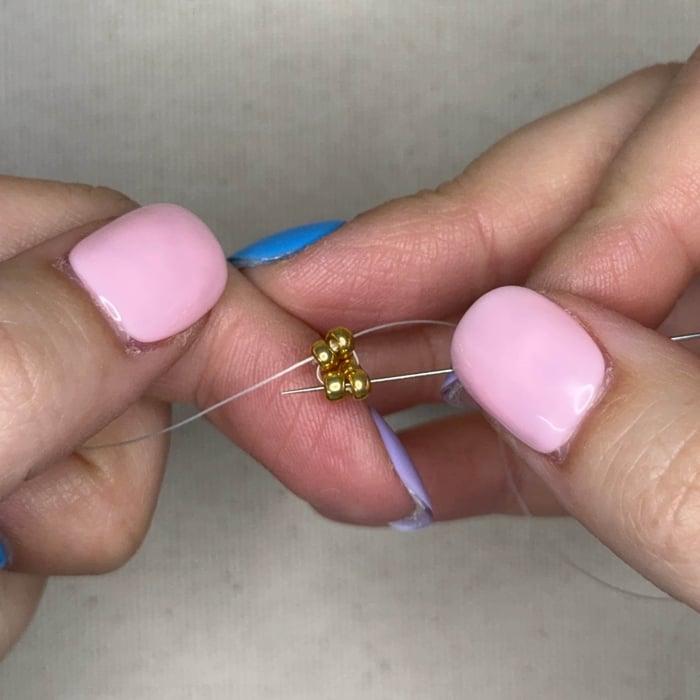
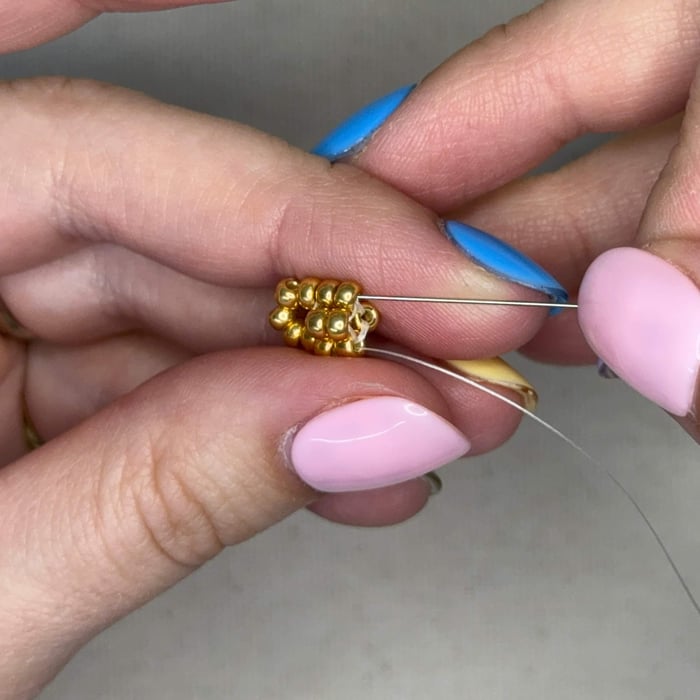
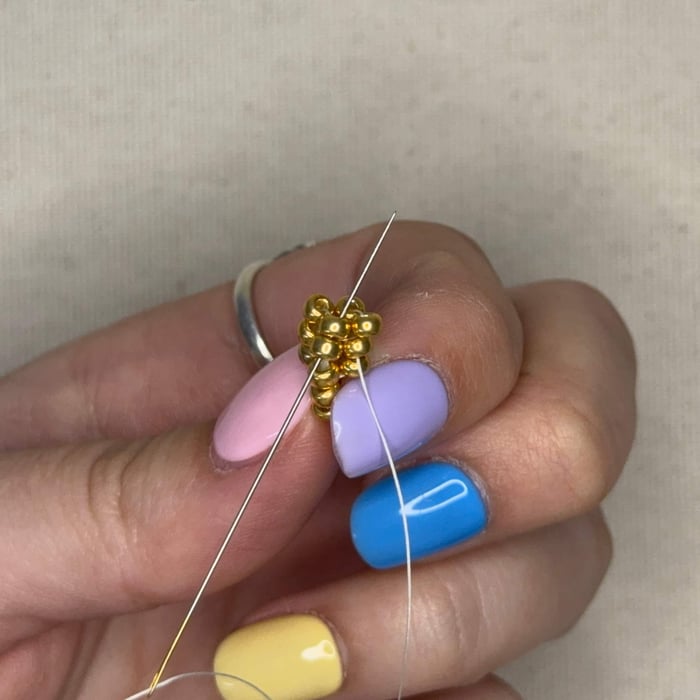
11. Going left (Counter clockwise from the knot) thread your needle through the row of beads shown
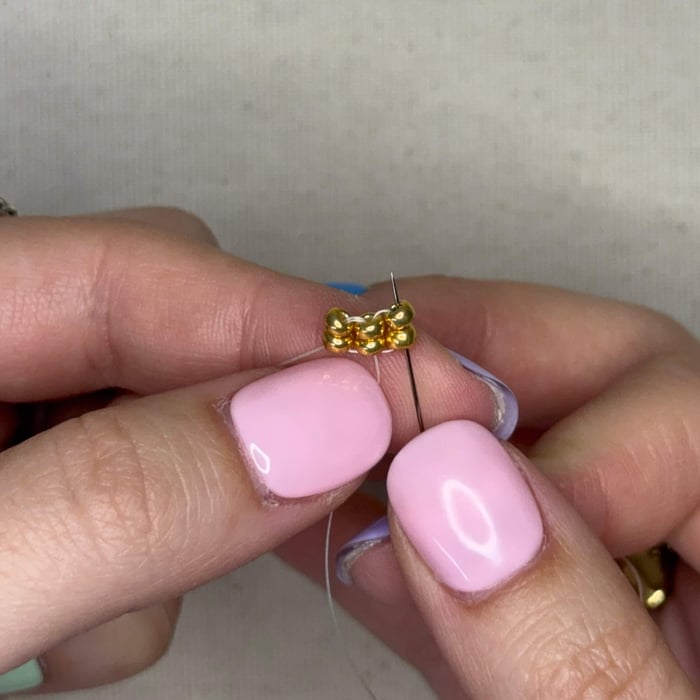
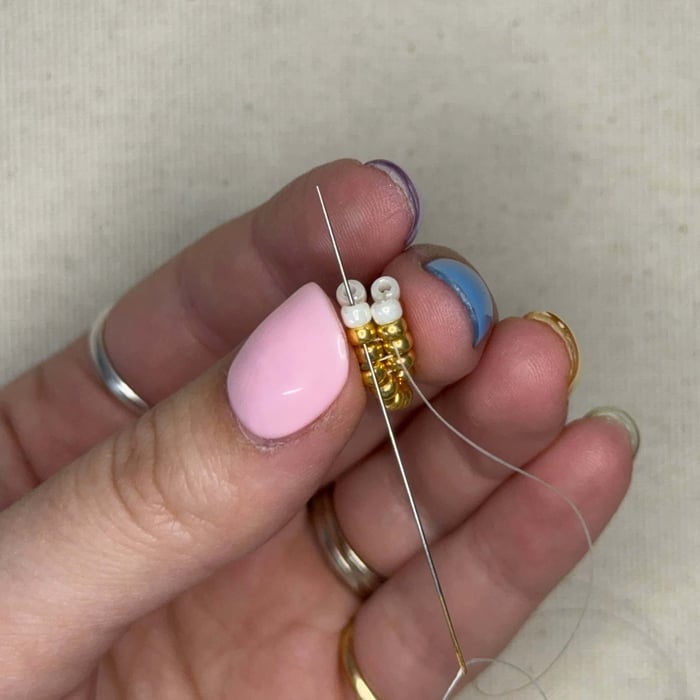
12. Keep going around until you have 2 threads between each row until you get back to the row with the tail. Cut the excess thread tail (glue when finished with project)

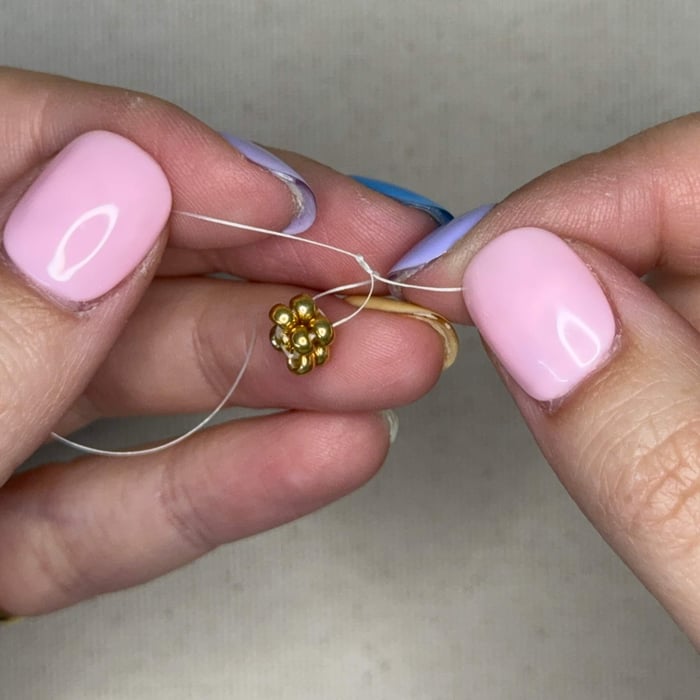
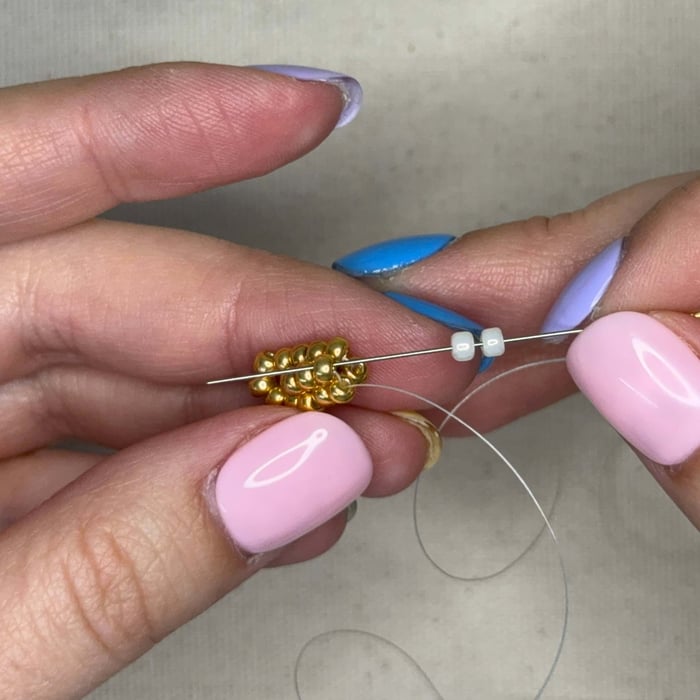
13. Pick up 5 gold beads with your needle and thread it through the row diagonally opposite to where your thread is in your project. Pull the needle through and pull tight
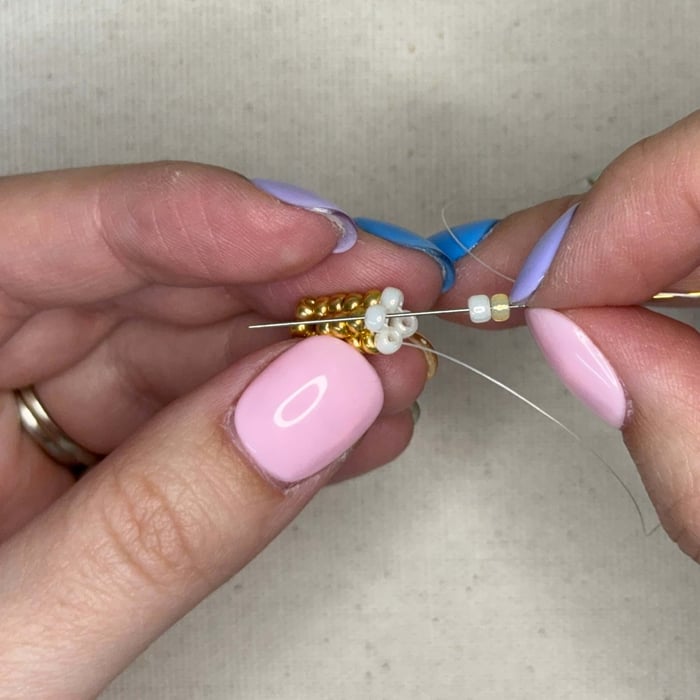
14. Go back up diagonally and through all 5 added beads and the two in the row
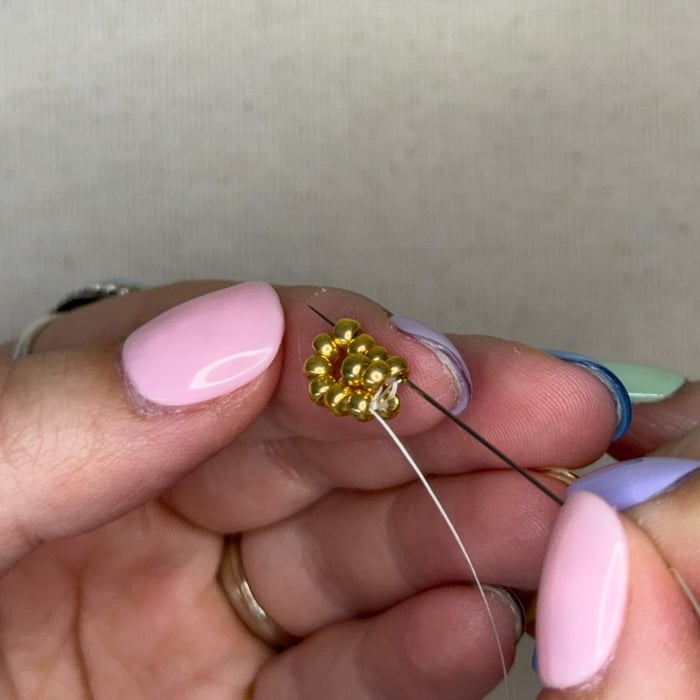
15. And then again for a third pass
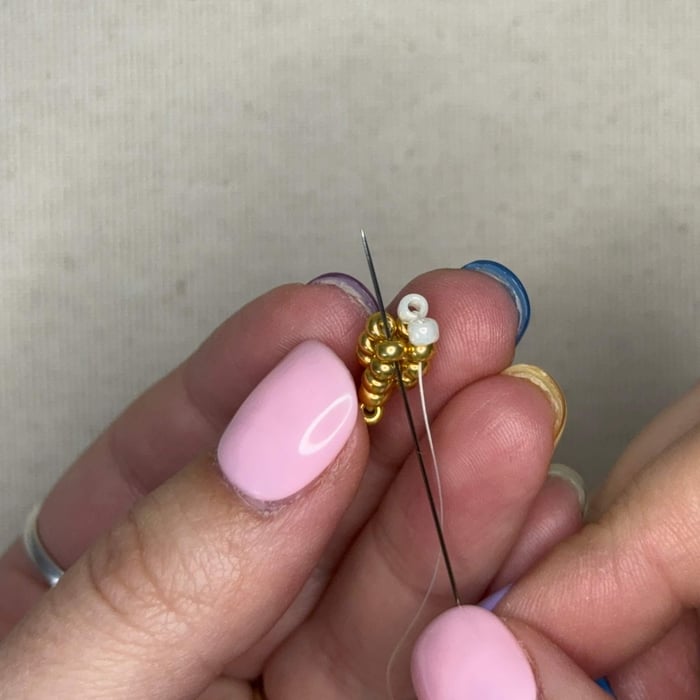
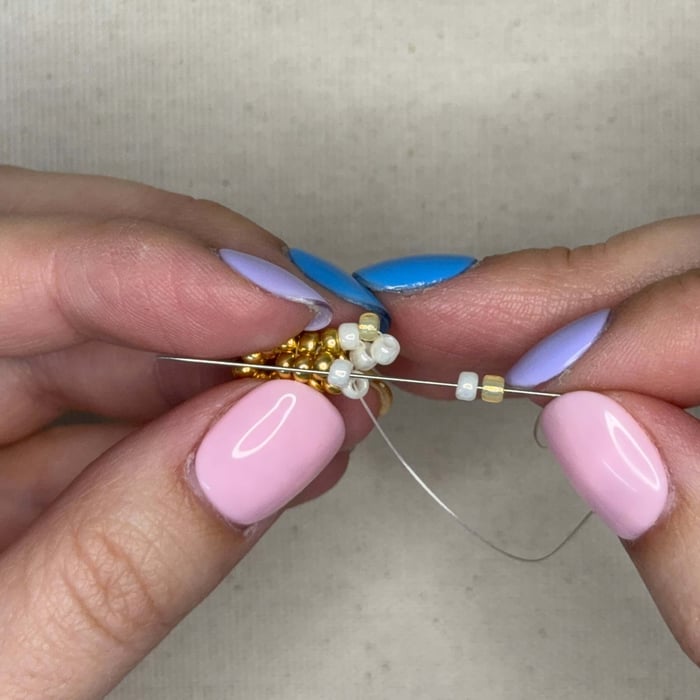
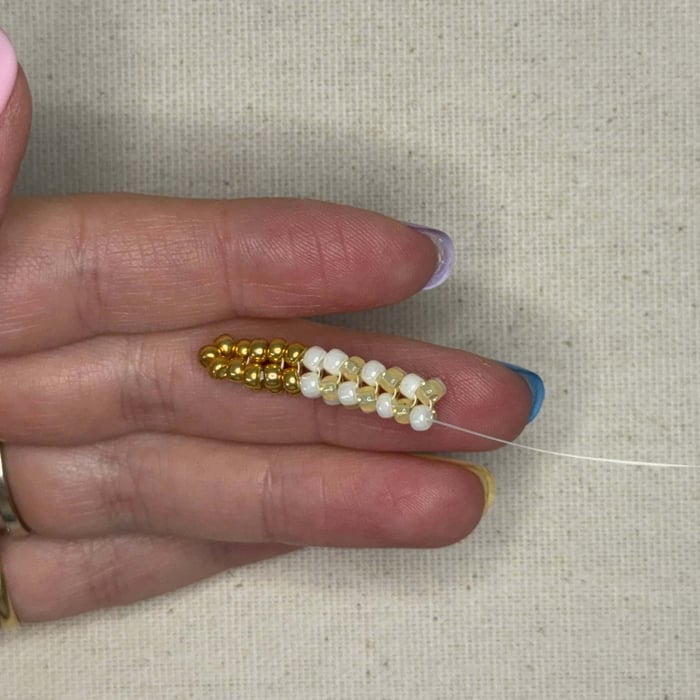
16. Now we can continue making our bracelet. Let's start the third row! Pick up 2 gold beads with your needle and thread it through ONE bead to your left (clockwise).
****IMPORTANT: It is very important to keep consistent tension while completing your project, keep things pulled tight, but not too tight.

17. Going clockwise, thread up through the next bead to your left. Only go through ONE bead

18. Pick up 2 beads with your needle and then thread the needle through ONE bead on the left (clockwise)
19. Then thread your needle up the next TWO beads clockwise.
20. Now for the next row follow the pattern by picking up two 421 ivory pearl beads
21. Pull tight. Thread the needle up ONE bead to the left clockwise
22. Pick up two more ivory beads then thread the needle down through the next bead (JUST ONE BEAD)
23. Then following clockwise, thread your needle up through TWO beads.
***Do you see the pattern? Each row is like this: Add two beads, down one bead, up one bead, add two beads, down one bead, up two beads.
24. Lets show one more row to get the hang of it. You'll find after completing 4-5 rows you will get into the rhythm.
Following the pattern (Each row starts with the first bead on the left in the pattern's picture), pick up one 578 Light Amber Opal / Gilt Lined and one 421 Ivory pearl bead. Then thread it through the bead to the left, clockwise.
 25. Thread the needle up through the bead to the left (clockwise)
26. Pick up a 578 bead and 421 Bead and thread your needle through the following bead clockwise
27. Then up through the next TWO beads to complete the row
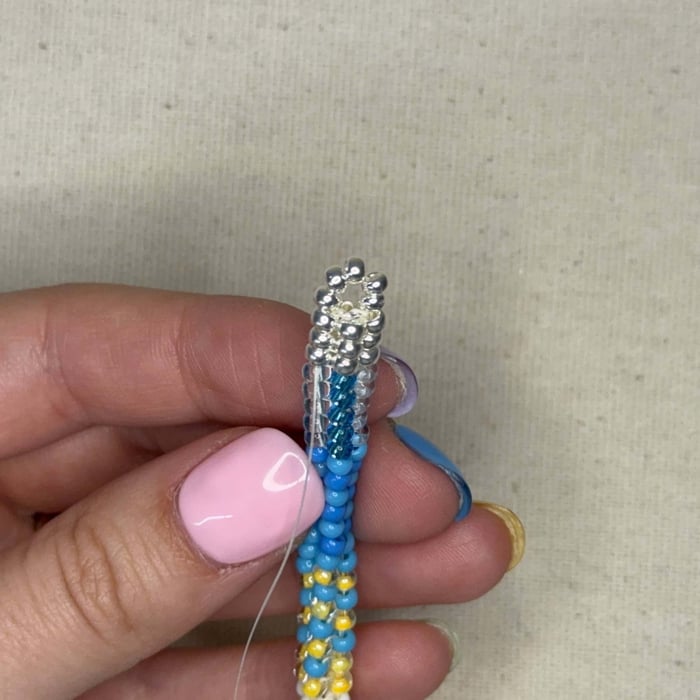
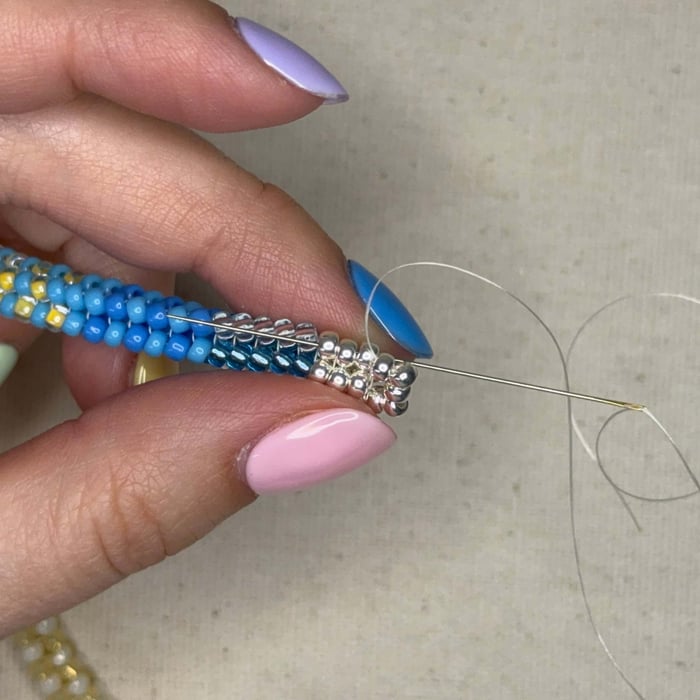
28. Continue along the pattern. Its easy to keep track of where you are in the pattern by knowing that the first bead on the left is the start of each row and that correlates to your project as it wraps around clockwise (ex: the first bead on the left will touch the last bead on the right when stitched onto your project)
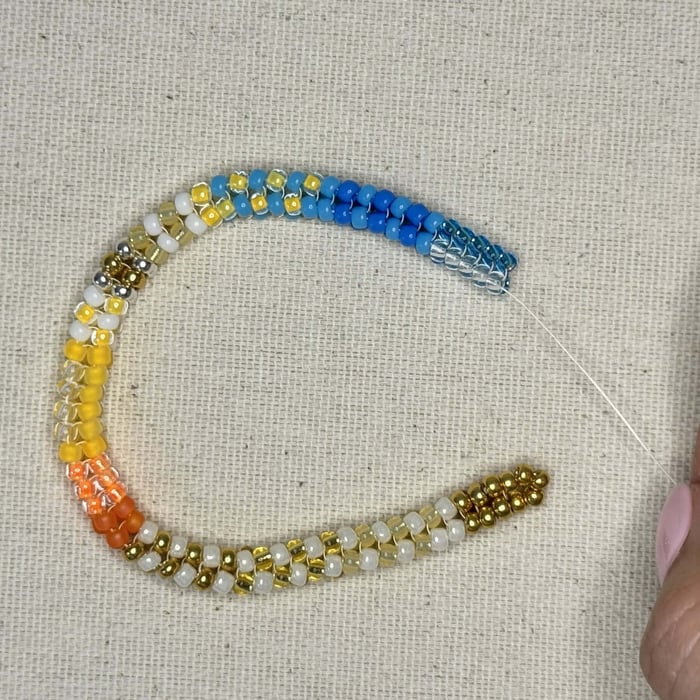
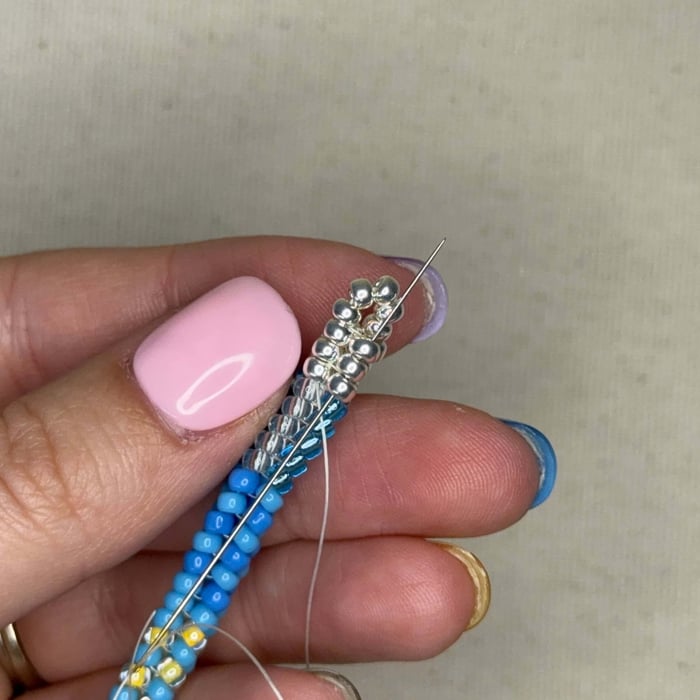
29. Continue along the pattern (reposted below) until you reach the last silver beads
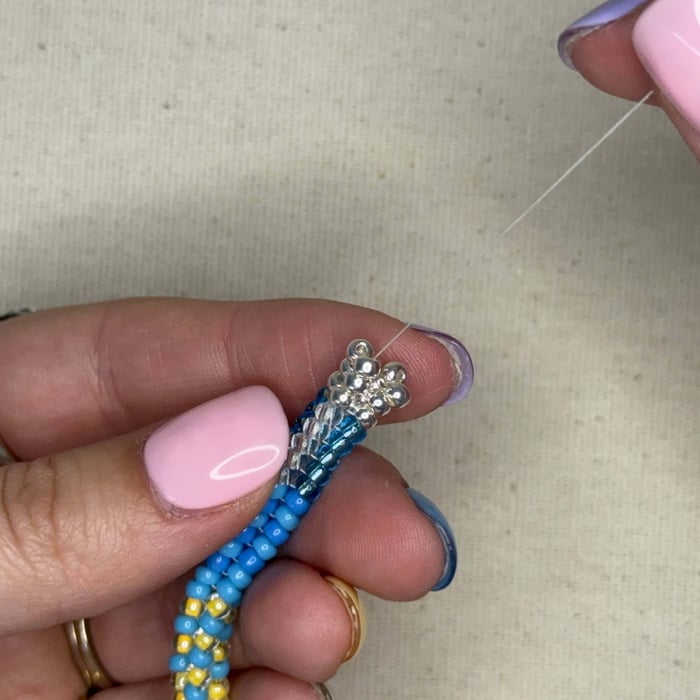
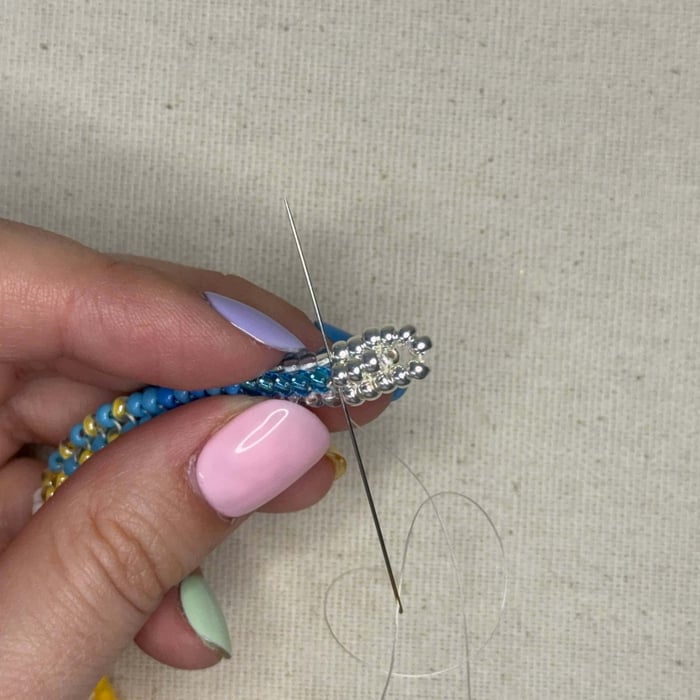
30. Stitch the next 3 rows of silver beads
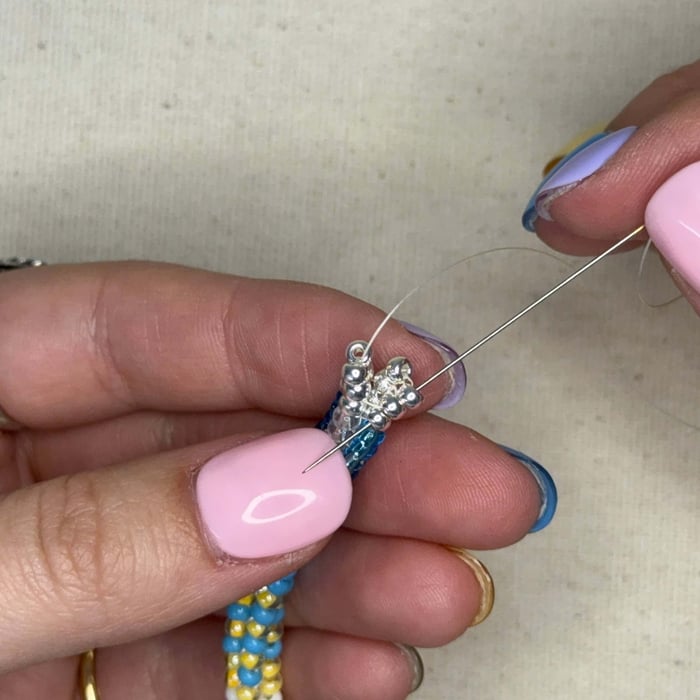
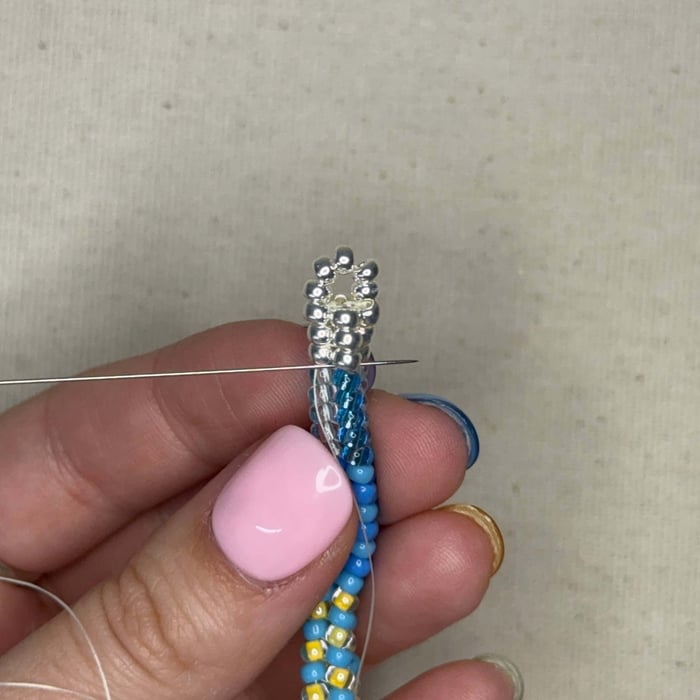
31. Thread your needle down the three silver beads to the right (counter clockwise)
32. Turn your project clockwise slightly and then thread your needle back up through the next 3 silver beads (to the right counter clockwise)
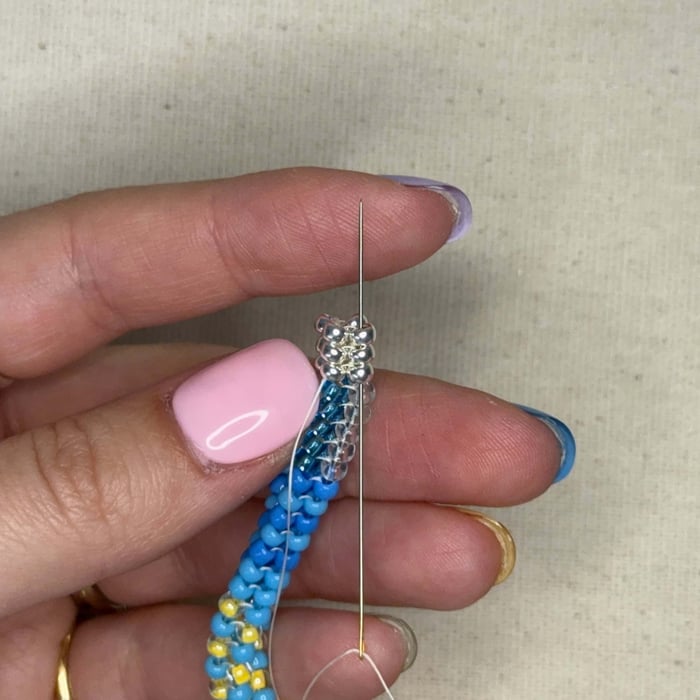
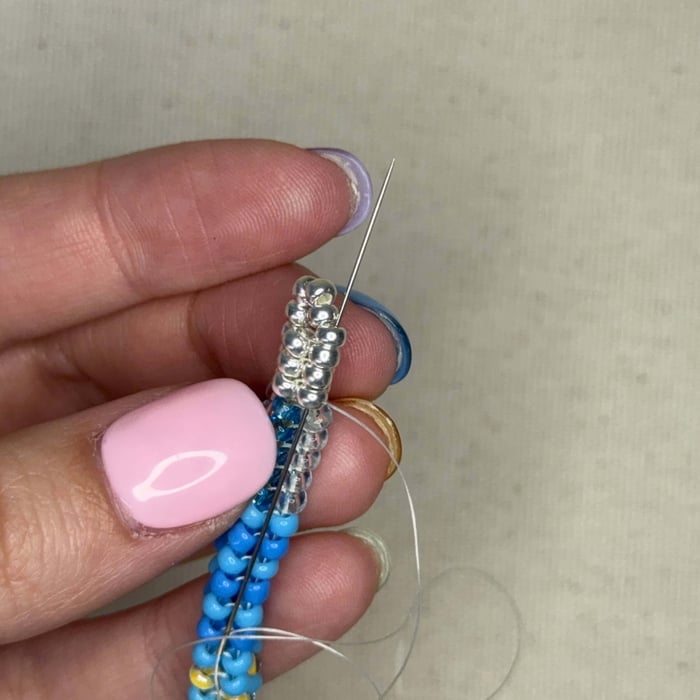
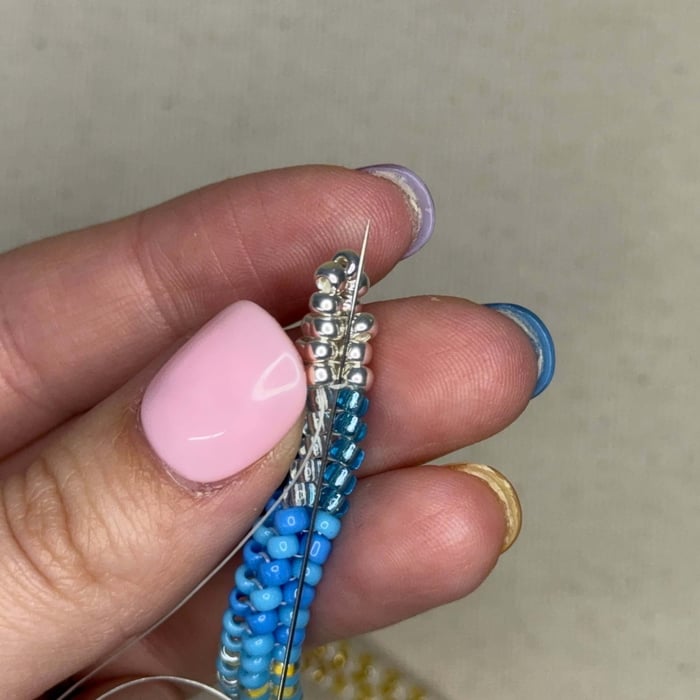
33. Then down 3 beads to the right (counter clockwise)
34. Then up the next 3 on the right
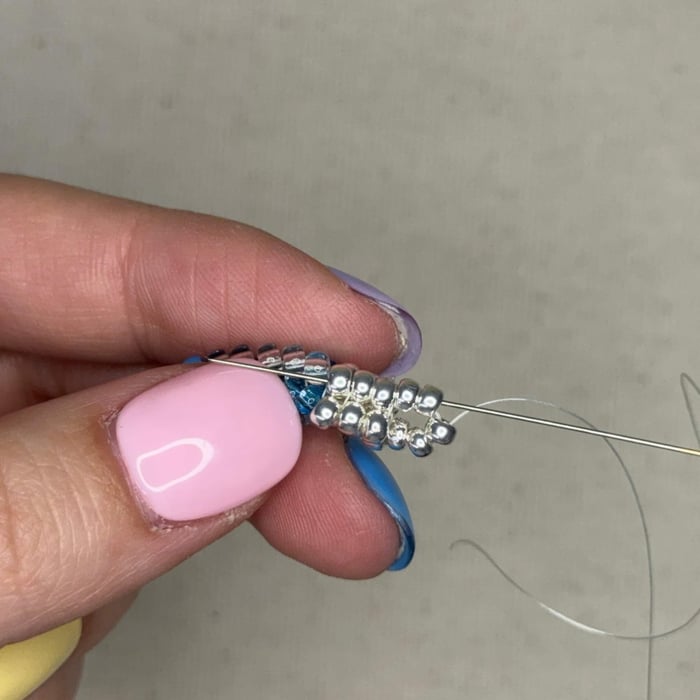
35. Pick up 5 silver beads on your needle and thread it through the opposite end of the "square" just like you did with the gold end
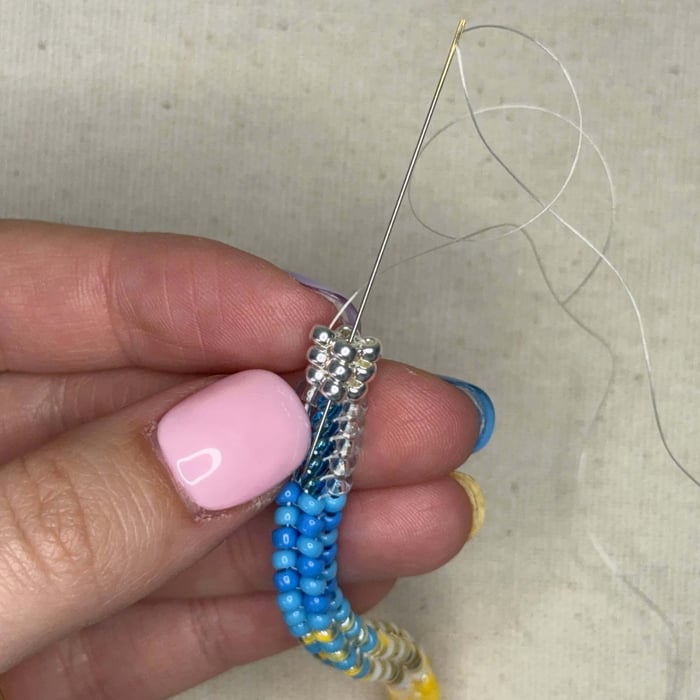
36. Pull that thread tight
37. Now we want our needle and thread on the other side of the project so you will gently poke the needle behind the silver beads shown
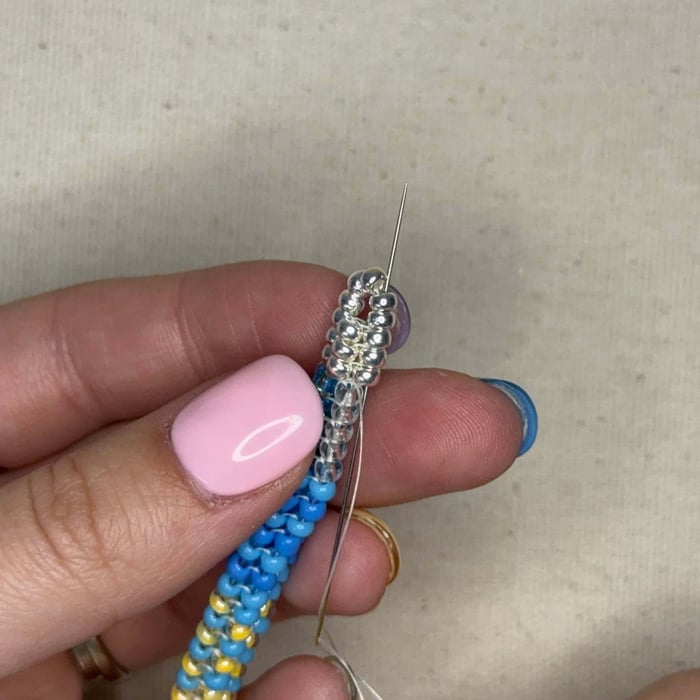
38. And then up through the 3 silver beads in the row and then up and around the 5 bead loop
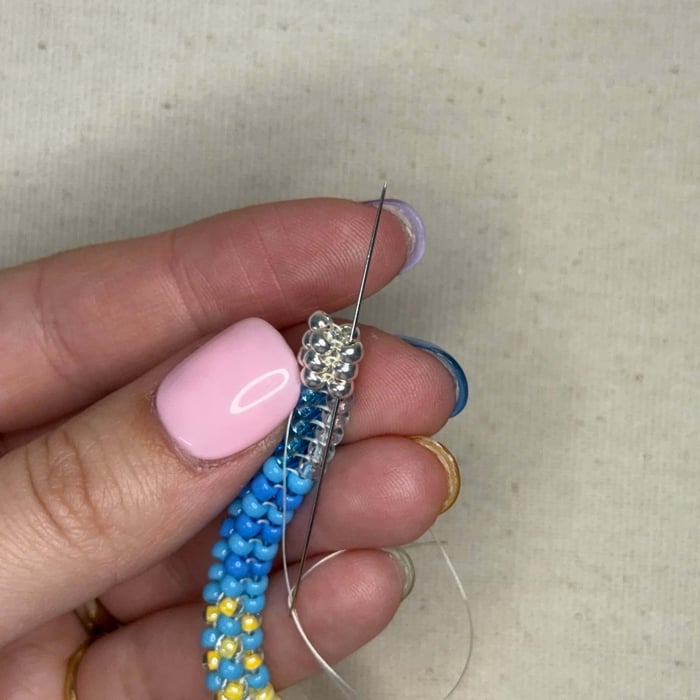
39. And down
40. Now repeat step 37 but going left instead of right
41. Then back up and around
42. And down
43. I then like to go around, up and down, through the rows like steps 31 through 34 counter clockwise until I make a full 360
44. Using your needle, gently pull a connecting thread between two beads - this is where your final knot will go

45. Pull the thread almost through to create a loop then wrap the loop around your needle twice to create a surgeon's knot, then pull tight. Create a second loop and surgeon's knot then cut the excess thread and glue this knot and then the very first knot by the gold beads
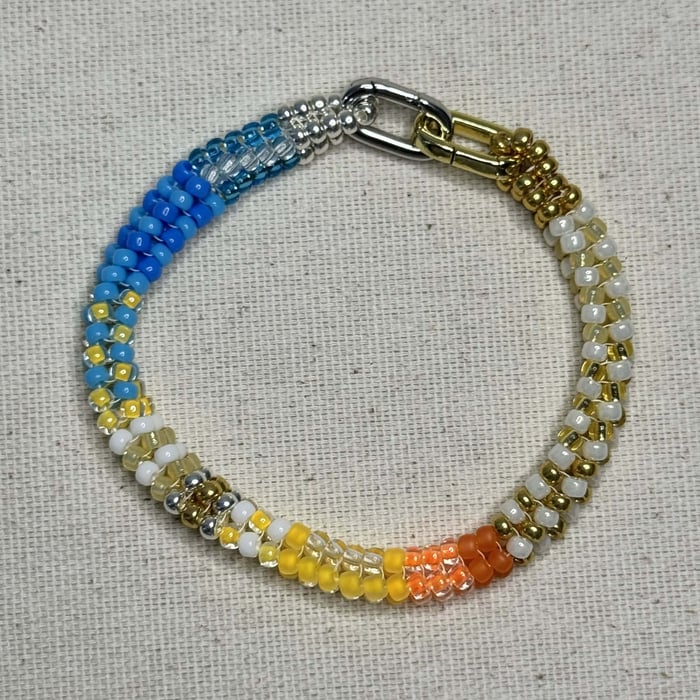
46. Attach your spring gate to the appropriate colors (silver onto silver and gold onto gold) to complete your bracelet!
Instructions on Construction - Necklace:
You will repeat all instructions above; however, you will use the pattern below to create your a 17 inch long tubular herringbone. There are a few more colors added. Please scroll to the top of the page for links to each new color.
FAQs
How long does this take to make
The first time you make this project: bracelet takes roughly 2 hours and the necklace can take about 4-5 hours. After a couple more goes at the tubular herringbone stitch you should be able to shave off up to half of the time
Related Articles
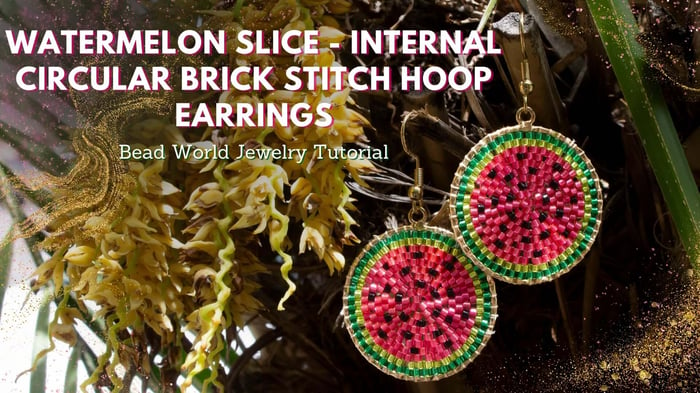
Watermelon Slice - Internal Circular Brick Stitch Hoop Earrings
Watermelon Slice - Internal Circular Brick Stitch Hoop Earrings These little watermelon slices are one of...
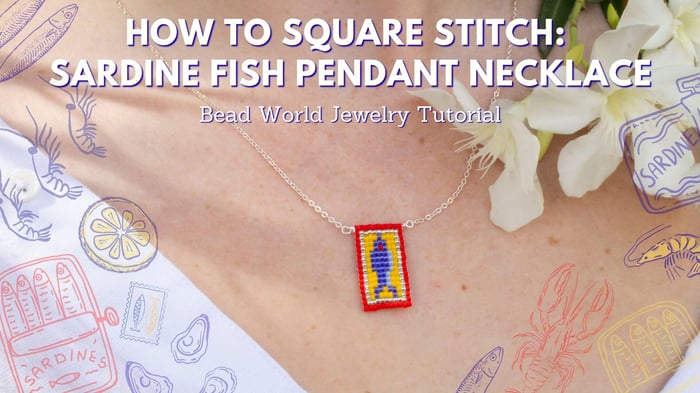
How to Square Stitch: Sardine Fish Pendant Necklace
How to Square Stitch: Sardine Fish Pendant Necklace Learn how to square stitch with this step-by-step...
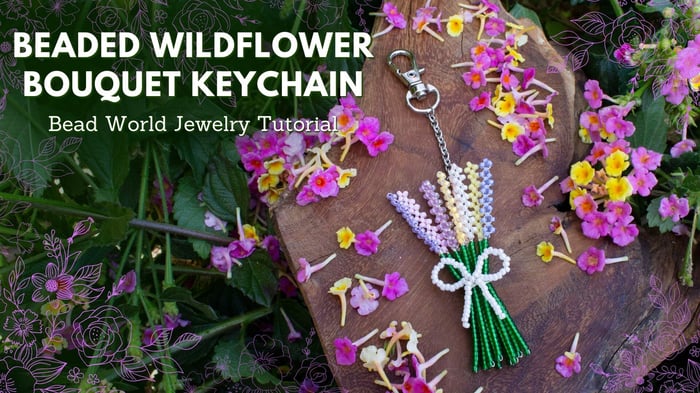
Beaded Wildflower Bouquet Keychain
Learn how to create a stunning beaded wildflower bouquet keychain with this easy-to-follow DIY seed bead...