Tutorials
Travel Bead Storage Container Tutorial
Travel Bead Storage Container Tutorial

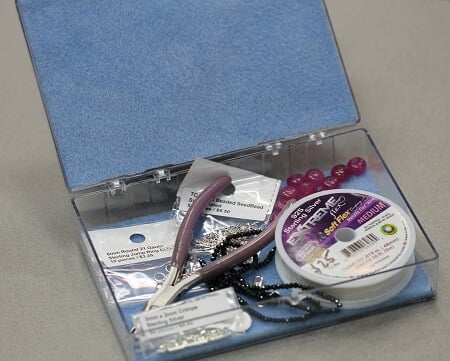
Check out this adorable DIY travel bead storage container! It has bead mats attached inside the case, making it the perfect container to take your beads with you. It allows you to work on a project anywhere without having to worry about your beads rolling all over!
.
This travel container was inspired by Scottsdale client Pam Howard. Take a peek at Pam’s super cute travel container using a vintage style tin.


.
We loved Pam’s travel container so much that we just had to make our own!!! Here’s all the information needed to make your own travel containers too:
.
You will need:
Storage Box
Bead Mat
E6000
Sharpie
Scissors

.
Place your storage container on your bead mat and use the sharpie to trace the outline of the container.

.
This is what it should look like after you’ve traced your outline.

.
Now flip your container upside down and trace the lid of the container. Some containers vary a little in size between the bottom and the lid, so you’ll want to do both.

.

.
This is what it will look like after you have traced both the top and the bottom.

.
Cut out the squares, just a little bit inside the lines you’ve drawn. You’ll want the section you cut out to be slightly smaller than the size of the outline.

.
Once you have cut out both the top and the bottom pieces, place them in your storage container to make sure that they fit. If they do not fit, trim them as needed or cut new pieces if they are too small.

.
After ensuring that the cut sections fit right, remove the pieces of bead mat and cover the inside of the bottom of the storage container in E6000. Make sure to get the edges well so that your bead mat is glued all the way to the edge.

.

.
Place that section of the bead mat on the glue and push down well.

.
Now repeat those steps, placing glue all along the inside of the lid and pushing the other cut section of the bead mat into the top.

.

.
Voila!!! Now fill your case with your supplies and take your project with you wherever you go! (The lid can be removed for an easier work space – just be careful when taking it on and off so that you do not break the pieces that hold the lid in place.) These are so quick and easy that you could make a separate travel case for each project that you have in the works to keep everything for each project together.
Happy Beading!
Related Articles

Jewelry Inspiration
Jewelry InspirationAt Bead World, we’re always fielding questions about how to find inspiration for new...

Gemstone of the Month: Tiger Eye
Gemstone of the Month: Tiger EyeThe golden shimmer of tiger’s eye was the first to catch my eye. Of all the...

Druzy & Pave Pendants
Druzy & Pave PendantsAt Bead World we’re super lucky to get to stare at beautiful things every day!! Some...