

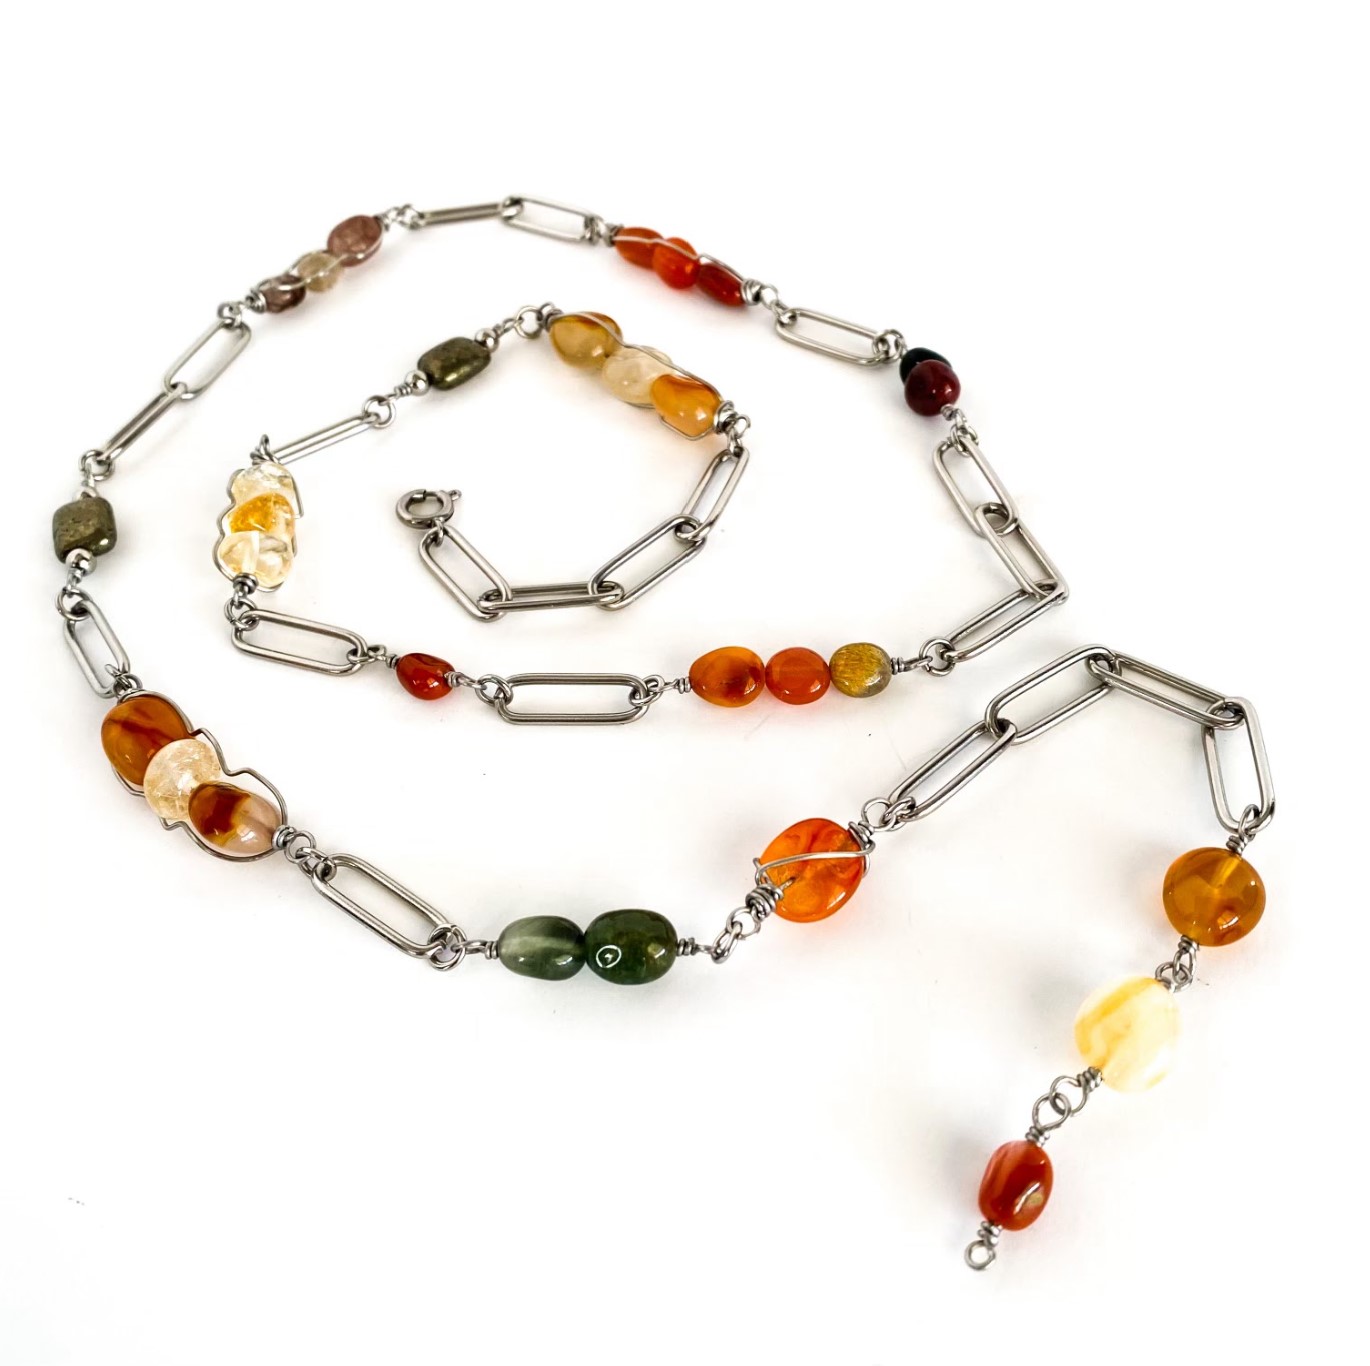
“Boho Gypsy Necklace”
“Boho Gypsy Necklace”
Skill Level: Intermediate Wire Wrapping
Finished Length 31” Adjustable
This is a necklace that looks good layered with other richly colored fall necklaces, or it can be worn solo. It has twelve wire wrapped segments that are connected by chain and a three-stone dangle on one end. The fastening can be worn at the back or at the front with a long dangle. I have used warm palette of Fall colors in a variety of different sizes and shapes. You can use different gemstones, or whatever beads talk to you
Materials Needed:
- 6-9mm Orange Agate Nugget (7)
- 10-12mm Natural Carnelian Polished, Slab (7)
- 6-9mm Rutilated Quartz, Nugget (4)
- 8-12mm Citrine, Center Drilled Nugget (5)
- 6-9mm Fancy Jasper, Nugget (4)
- 8x10mm Pyrite, Puffy Rectangle (2)
- 4mm Round Beads, Stainless Steel (4)
- 19x6.5mm Paper Clip Chain, Stainless Steel, (Approx. 2”)
- 22g Craft Wire, Brushed Silver * Bought by the spool
- 5mm Round 18g Jump Rings, Stainless Steel (22)
- 8mm Spring Clasp, Stainless Steel (1)
Tools Required:
Needle Nose Pliers (also known as chain nose)
Wire Cutter, (for the stainless steel chain)
Key Code:
A = Orange Agate Nugget B = Natural Carnelian C = Rutilated Quartz D = Citrine E = Fancy Jasper F = Pyrite G = Stainless Steel Beads
There are three different types of wire wrap used and these are each repeated a few times. We will start by completing the wire wrapped segments and then construct the necklace by connecting the various segments with jump rings and chain.
* Before starting the first wire wrap you need to decide on the size of the loops that you will be making, then using a sharpie put a line across both jaws of your round nose pliers, this gives you a template to line up against each time you form a loop. I made a line approx. 1/4” from the end of pliers for my loops in this project.
Instructions on Construction of Wire Wrapped Segments:
I suggest that when you have completed the segments that you look at the pics and lay the segments out in the order that they will be connected as this will make assembly much easier!
# 1 - “Simple Connector Bar” *There are six of these segments and the bead loading sequences are as follows:
G (1), F (1), G (1) * there are two of these segments with the same pattern
A (1) * one of these segments
A (2), C (1) * one of these segments
E (2) * there are two of these segments
1. Cut a 3” section of wire then using needle nose pliers make first 90-degree angle approx. 1.25” from end of wire, then use round nose pliers to form loop (at the line you have marked as template). Cover loop with your needle nose pliers and use your round nose pliers to wrap short wire around the long wire once, do not trim wire.
2. Thread beading sequence (the six bead layouts are shown above) onto long wire, then use your needle nose pliers to form a 90-degree angle. Form loop and wrap one full turn around the central core wire.
3. Continue alternating sides, wrapping the wire one half turn at a time, until you have reached the bead on both sides, trim, and tuck in ends using needle nose pliers.
#2 - “Double Cage Wrap” * Make five of these segments and the bead loading sequences are as follows:
B (3) * one of these segments D (3) * one of these segments A (3) * one of these segments
C (3) * one of these segments B (1), D (1), B (1) * one of these segments
1. Cut a 10” section of wire, approx. halfway down your wire, use your needle nose pliers to form a 90-degree angle and your round nosed pliers to form a loop, wrap the wire one full turn around the core wire, do not trim.
2. Thread beading sequence (the five bead layouts are shown above) then after last bead use your needle nose pliers to form a 90-degree, form loop and wrap one full turn around the core wire.
3. Continue alternating sides, wrapping the wire closed one half turn at a time, until you have reached the bead on both sides. These wraps are going to be covered completely so it does not matter what they look like. Finish wrapping with your wires going in opposite directions. * The beauty of wrapping both sides at the same time is that you end up with an equal number of wraps on either side of the bead/s.
4. Bend both wires towards the opposite sides wire wrap, forming a cage around the bead. Continue wrapping the wire over the initial wire wrap, securing the cage, and creating a messy, artistic wire wrap on each end. Cut off excess wire on each end and tuck end of wire into the coil.
5. As an optional final touch, I took my needle nose pliers and put some wavy movement into either side of the wire cages. You can get this effect by grabbing the wire with needle nose pliers and then twisting your wrist slightly. These are fun to do, so experiment to get the look you like.
#3 – “Twist Wrapped Bead” * Make one of these segments
1. Cut a 10” section of wire, approx. 1.25” from end of the wire form a 90-degree angle.
2. Create loop and wrap the short wire around the long wire a few times. Cut off excess wire and tap in pointy end. This wrap is going to be covered completely, so it does not matter what it looks like.
3. Thread B (1) then form loop on the second side of bead, wrap back down to the bead, this wrap is also going to be covered completely so it does not matter what it looks like. * I find it easier to wrap the wire just using my hand, instead of using round nose pliers when I have a longer length of wire.
4. You will now wrap the same wire on top of the wrap you just made to make it look like a messy wrap. * I do this by going quickly back up to the loop and gradually wrapping back towards the bead, so that it forms somewhat of a cone shape.
5. Begin twisting the wire around the bead. It is easiest to use your thumbs to twist the wire around the bead and hold it in place. Continue twisting the wire around the bead until you reach the other wire wrap.
6. Wrap the wire on top of the first wire wrapped section in a messy fashion to secure the twist and add an artistic finish.
7. At this stage you can do one of two things, you can either cut off any excess wire and tuck end of wire into coil, or you can do what I did and that is to turn back around and twist the wire back over the bead so that it forms a crisscross then wrap the wire once around first coil, trim and tuck in the end, using needle nose pliers.
Making the end of chain dangle
1. Cut three 3” sections of wire, for the end dangle section take one piece of wire and make a small loop at end of wire, wrap once, add A (1), make the second loop, and wrap once, finish wrapping in the same manner as for the simple connector bar.
2. Take second piece of wire, make loop and thread the loop (before wrapping) onto the loop of the segment just completed, wrap wire once. Add D (1) and finish as above.
3. Take third piece of wire, make loop and thread to the loop on segment just completed, wrap wire once. Add B (1), make second loop and thread into an end link of paper clip chain, then finish wrap as above.
You are in the final stretch… connecting the segments to make the necklace! We will assemble the necklace from the dangle end that you have just attached.
1. Cut a four-link section of chain and connect a #3 segment to the chain using a jump ring. Use flat nose and needle nose pliers to open the jump ring. The best way to do this is to hold flat nose in your non dominant hand (left hand if you are right hand dominant), grip the jump ring on the left of the opening and with the needle nose pliers in your right-hand twist away from you. * Do not over open the jump ring, thread the jump ring into chain and loop on first segment. Close the jump ring, being careful that the two sides come together and there are no gaps.
2. Connect this segment using a jump ring to the #1 segment that has two fancy jasper beads (E (2).
3. Cut a 1-link section of chain and connect between the last segment and the #2 segment with carnelian, citrine, carnelian layout.
4. Cut a 1-link section of chain and connect to a #1 segment with stainless steel, pyrite, stainless steel layout
5. Cut a 2-link section of chain and connect previous segment to a #2 segment with three rutilated quartz
6. Cut a 2-link section of chain and connect previous segment to a #2 segment with three orange agate, A (3)
7. Cut a 1-link section of chain and connect previous segment to a #1 segment with two fancy jasper, E (2)
8. Cut a 3-link section of chain and connect previous segment to a #1 segment with two orange agate and one rutilated quartz.
9. Cut a 1-link section of chain and connect previous segment to a #1 segment with one orange agate.
10. Cut a 1-link section of chain and connect previous segment to a #2 segment with three citrine beads.
11. Cut a 1-link section of chain and connect previous segment to a #1 segment with G (1), F (1), G (1) layout.
12. Connect this last segment to the final #2 segment that contains three carnelian beads, B (3).
13. Connect this last segment to a 4-link section of chain and attach the clasp to the final link.
14. Try on your new necklace and admire your handywork! Enjoy!
Designed by Steph Stirniman
Recent Posts
-

"Abalone Sea" Dangle Earrings
"Abalone Sea" Dangle EarringsIn this tutorial, you'll blend delicate design with the luminescent bea …24th Apr 2024 -

"Gem Keeper" Chain Cage Pendant Necklace
"Gem Keeper" Chain Cage Pendant NecklaceNo hole no problem! Keep anything from gems with no holes, b …29th Mar 2024 -

Layered Beaded Charm Necklaces
Layered Beaded Charm NecklacesLayered necklaces are a fashion staple that adds depth and dimension t …26th Feb 2024