

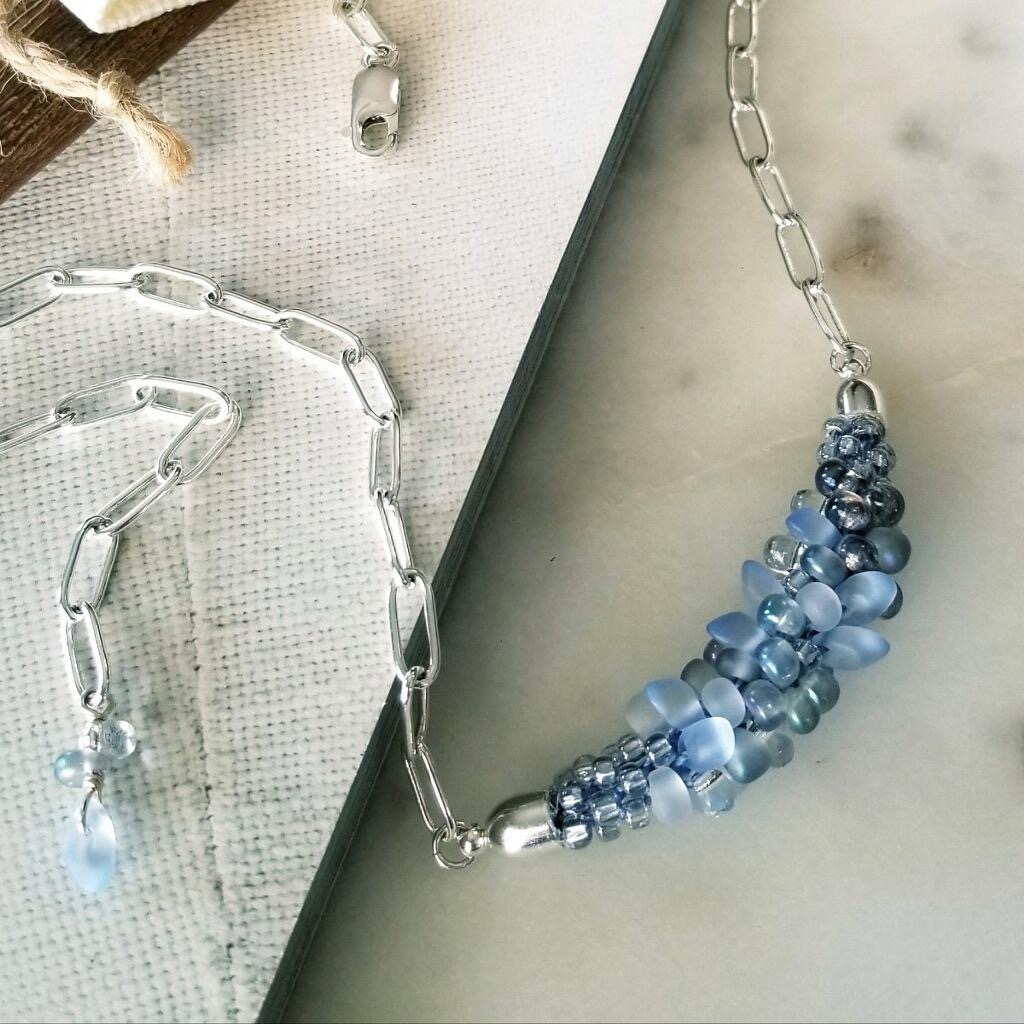
“Into the Blue” – Kumihimo Bar Style Necklace
“Into the Blue” – Kumihimo Bar Style Necklace
The color palette of this necklace is cool, calm & delicious…. but you could change it up & work with your favorite colors or make a variety of necklaces to go with your different wardrobe choices.
Materials Needed:
- (12’) Macramé Cord, S-Lon Medium, Color – Blue Morning (or whatever color works with your bead choice)
- 4 x 7mm Magatamas – Transparent Light Sapphire Matte (1 Tube – 12 used approx. 85 in tube)
- 4mm Magatamas – Apparition Mix (1 Tube – 44 used approx. 110 in tube)
- Size 8 Miyuki Seed Beads # 721 Crystal/Sparkle Grey Lined (1 Tube – 32 used)
- 15 – 18” Silver Plated Chain # 9311S 50 (or Chain of your choice) *** 15” was used in this necklace, if you need larger size add a few extra inches.
- 4mm Round 21g Silver Plated Open Jump Rings (1 packet – 2 Used)
- Silver Plated 4mm Bullet End Caps (1 pair)
- Sterling Silver Lobster Claw Clasp 5.5 x 14mm (1)
- Optional 2” 24g headpin (sterling silver or plated) Used for wire wrap dangle (1)
- Optional small charm to be used in place of wire wrap if you prefer the look, or do not know how to wire wrap
Finished Length 16 -18” (this can be made to whatever length that you choose)
Tools Required
Round (or Mini) Kumihimo Braiding Disk
Optional - 8 x Bobbins (for holding macramé cord)
Needle Nose Pliers (also known as chain nose)
Instructions on Construction:
*** When making a kumihimo braid try to keep your weight centered in the hole & make sure that it is hanging because if it is resting on any surface it cannot act as a weight and your tension will start to look strange.
*** If you have to put your braid down & walk away remember to leave it with three strands in the bottom position, that way you will always know to start when you resume working on it.
*** Keep a tall tumbler handy, if you leave your work you can place the disk on top of the tumbler and everything stays neat.
*** Keep an eye on your work as you go that way you can correct any mistakes sooner than later. If you look at the braid and something looks strange (tension or missing bead maybe) you can reverse the flow of work and that will undo your braid, you can go back to the mistake and correct it. This means you will go from top left to bottom left, bottom right to top right and then turn ¼ turn clockwise and repeat. Give it a try, it works!
You will need a random mix of 56 magatamas in this project (consisting of both sizes) so before starting take your bead mat and collect 12 larger sapphire matte magatamas & 44 4mm apparition mix magatamas. The apparition mix is made up of number of colors & finishes, get a real equal mix of all colors. Mix your pile of 56 beads & then divide randomly into eight piles of 7 beads on your bead mat.
1. Cut the 12’ of macramé cord into eight 18” lengths. Tie all eight macramé cord tails together using an overhand knot (like tying a balloon).
2. On one cord, string 2 size 8 seed bead, 7 magatama mix, 2 size 8 seed bead and tie a double knot at the end of the strand to act as a stopper. Repeat this with the other seven cords.
3. Since these are short cords and you are only using a small number of beads it is not necessary to use bobbins for this project, unless you are like me and prefer to! I have allowed enough cord that you can wind onto the bobbins and this keeps everything neat and easy to use.
4. Place the eight-strand knot into the hole in the center of the kumihimo disk and position the cords around the disk using the four dots as guides (one cord to each side of the dots). Slide a cord into each of the eight notches, pull the cords tight and clip the weight to the knot.
5. Begin kumihimo by moving the cord at the top right (between 32 & 1) to the bottom right (between 14 & 15). Move the cord at bottom left (between 16 & 17) to the top left (between 30 & 31). Pull the cords firmly into notches as this will help keep a good tension.
6. Rotate the entire kumihimo disk counterclockwise ¼ turn. Move the cord at the top right (between 8 & 9) to the bottom right (between 22 & 23), move the cord at the bottom left (between 24 & 25) to the top left (between 6 & 7). Repeat until you have about 1/4 – 1/2” of a kumihimo braid.
7. Now the fun begins & it’s time to add beads. You will be repeating the previous instructions but this time when you move the cord from the notch, slide one bead from that cord towards the center braid. You will slide the bead underneath the first cord that you cross over (this locks the bead into place) the cord will go to the same position that you have been doing.
*** It does help if your tension is tight, as it is easier to slide the bead under a taught strand). Remember to move cord from top right to bottom
right, then bottom left to top left, rotate disk ¼ turn counterclockwise and repeat. The magatamas lock in the same way as the seed beads, just make sure that the long pointy end is facing out.
8. Repeat step 7 adding a bead each time you move the cord until all beads are used. Repeat steps 5 and 6 creating a braid that is just cord (the same as beginning). Unclip the weight and gently remove all eight cords from the kumihimo disk. Tie the ends of the cord in an overhand knot.
9. Use a thread zapper to cut the knot off each end, melting the ends and securing the braid. Slide the end cap onto each end to determine how much more of the braid needs to be cut off for the end cap to reach the beads (you do not want to see any of the raw cord, so the end cap should meet flush with the seed beads). Trim off any extra length with the thread zapper. The remaining braid end should be slightly less than 1/4” long.
10. Place a small amount of E6000 glue on one kumihimo braid end (a toothpick is a handy tool to help with this). I also put some glue into the end cap to make sure that the braid is well attached inside the end cap. Slide the end cap onto the braid end. Clean up any extra glue as necessary (if you miss some glue it is possible to scrape off the end cap when dry). Repeat on the second end. At this stage make sure that the rings on the end caps are facing in the same direction! E6000 takes a while to fully cure so be cautious while finishing the rest of the necklace, or if you can be really patient allow to cure for several hours before completing the next stage.
11. The chain used in this necklace was cut so that the clasp side had 19 links and the side with wire wrapped dangle had 24 links, this gives you a built in extension chain with pleasing drop that terminates with the wire wrap. If you need larger or smaller size add or decrease chain length here. Use your wire cutters to cut chain.
12. Attach chain to end caps using the 4mm round jump rings, your needle nose and flat nose pliers are good tools for this task. Attach lobster claw clasp to the shorter section of chain using the jump ring that comes with the sterling silver clasp. There is an optional wire wrapped dangle attached to the longer length of chain. If you prefer you can substitute with a small charm that can be attached with a jump ring. Use your round and needle nose pliers to make this dangle, take the headpin and cut off the head, make a tent wrap to attach the larger magatama, thread on 2 smaller magatamas and then wire wrap to the last link in the chain.
13. Try on your new necklace & admire your handiwork!
14. Enjoy!
Jewelry designed by Steph Stirniman at magpiecollectives.com
Recent Posts
-

"Abalone Sea" Dangle Earrings
"Abalone Sea" Dangle EarringsIn this tutorial, you'll blend delicate design with the luminescent bea …24th Apr 2024 -

"Gem Keeper" Chain Cage Pendant Necklace
"Gem Keeper" Chain Cage Pendant NecklaceNo hole no problem! Keep anything from gems with no holes, b …29th Mar 2024 -

Layered Beaded Charm Necklaces
Layered Beaded Charm NecklacesLayered necklaces are a fashion staple that adds depth and dimension t …26th Feb 2024